Important! This recipe should only be used if you wish to prepare solid “hard-cooked” eggless eggs. If you wish to prepare vegan deviled “eggs” or eggless “egg” salad, please see the appropriate recipe in this blog or in my Non-Dairy Evolution Cookbook, as these recipes are much less involved and easier to prepare.
This is my own recipe and technique for producing “hard-cooked” eggless eggs that are remarkably similar to their egg counterparts in appearance, flavor and texture. For this recipe, you will need 2 six-count egg molds which will yield one dozen “hard-cooked” eggless eggs. If you only have one mold set, any remaining “yolk” and “egg white” mixture” can be used for crumbled “hard-cooked” eggless egg (superb for topping cold salads) or for eggless egg salad sandwiches.
Please note: The “eggs” cannot be used for heated applications, such as “Scotch eggs”, because the agar will melt and the eggs will turn to mush. They must remain chilled or at room temperature for serving.
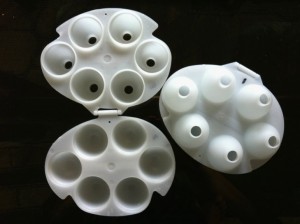
About the egg molds: The internet source I was recommending for the egg molds is no longer offering that product, so you will have to do some internet searching for the molds. Many of my readers have found luck locating them on Ebay.com (search for “Jell-O jiggler egg molds”).
Food Processor Ingredients for the “Egg Yolks”
• 5 oz pressed extra-firm block tofu (about one-half of a standard block; do not use silken tofu)
• 2 T refined coconut oil, melted
• 2 T nutritional yeast flakes
• ¼ tsp sodium alginate, guar gum or xanthan gum
Saucepan Ingredients for the “Egg Yolks”
• ½ cup water
• 1 and ½ tsp agar powder
• ½ tsp sweet paprika
• ½ tsp ground turmeric
• ¼ tsp kala namak (Himalayan black salt)
Blender Ingredients for the “Egg Whites”
• 5 oz pressed extra-firm block tofu (about one-half of a standard block; do not use silken tofu)
• 3 cups water
• ½ cup plain unsweetened non-dairy milk
• 4 tsp agar powder
• 1 and ¼ tsp kala namak (Himalayan black salt)
Additional Items Needed
• 2 six-count egg molds
• food processor
• blender
• small saucepan
• a melon baller or ½ T measuring spoon
• small food storage container that will hold about 2 cups
• 2 cup measuring cup with pouring lip
• wax paper or parchment paper
Preparing the “Yolks”
Set the “egg molds” aside. Be sure they are completely snapped together.
Place the food processor ingredients for the “yolks” into a food processor; process into a coarse paste.
Combine the saucepan ingredients for the “yolks” in the saucepan and heat until bubbly over medium heat. Swirl the contents occasionally as the mixture heats.
With the food processor running, pour the molten saucepan mixture into the food chute. Process the entire contents until smooth. Stop as needed to scrape down the sides with a flexible spatula.
Transfer the “yolk” mixture to the food storage container and chill uncovered for a minimum of 1 hour to firm.
Line a plate with wax or parchment paper. Using a melon baller, rounded measuring spoon or similar object, scoop some of the “yolk” mixture into a rough ball shape, about the size of a hardened egg yolk. Roll the mixture between your palms to round the ball and smooth the surface a bit. It doesn’t have to be totally smooth. Set it on the lined plate. Repeat the procedure until you have 12 “yolks”. Make sure the “yolks” are not touching each other on the plate or they will stick together when frozen. This procedure is a bit messy and some of the mixture will stick to your hands, so keep a moist towel nearby. Place the uncovered plate into the freezer for about 1 hour. Avoid freezing for more than 2 hours or ice crystals will form on the “yolks”.
Preparing the “Egg Whites”
When ready to proceed, add the blender ingredients for the “egg whites” to a blender and process until completely liquefied. Add half of the mixture to the saucepan and heat to a soft boil, stirring frequently to avoid scorching. Transfer the hot mixture to the measuring cup with the lip. The mixture may begin to curdle a bit in the measuring cup – this is normal and will not affect the finished flavor or texture. Pour the mixture into the molds, filling them no more than halfway. Let cool at room temperature for 10 minutes to help set the “white” mixture just a bit (this will help keep the yolk suspended, rather than sinking).
Carefully open the molds and place the frozen “yolks” in the center of each “white”. Close the molds and securely snap shut. Make sure they are completely snapped shut or the molten “white” mixture will leak out when topping off.
Pour the remaining “egg white” mixture into the saucepan and bring to a soft boil, stirring frequently. Transfer the mixture to the measuring cup and then fill each egg mold with the mixture to the top of the stems. The mixture may begin to curdle a bit in the measuring cup – this is normal and will not affect the finished flavor or texture. Let settle momentarily and then top off each mold with the mixture (the excess “whites” in the stems can be trimmed away later).
Transfer the molds to the refrigerator and chill for a few hours until completely set. Be careful handling the molds when transferring to the refrigerator so they do not pop open accidentally (for assurance, place the molds on a tray and then transfer to the refrigerator).
Finishing the “Hard-Boiled Eggs”
Open the molds and pop out the “eggs”. There will be a seam on the “eggs” where the molds joined together. Use a dry paper towel to gently rub the “egg” and remove the seam. Trim off the stem ends as needed with a paring knife. Chill the “eggs” in an airtight container until ready to use. The “eggs” should be consumed within 1 week. I’ve never frozen them for storage, so I cannot advise if this can be done successfully without damaging the texture.


| Servings |
|
|
|
|