Important! This recipe should only be used if you wish to prepare solid “hard-cooked” eggless eggs. If you wish to prepare vegan deviled “eggs” or eggless “egg” salad, please see the appropriate recipe in this blog or in my Non-Dairy Evolution Cookbook, as these recipes are much less involved and easier to prepare.
This is my own recipe and technique for producing “hard-cooked” eggless eggs that are remarkably similar to their egg counterparts in appearance, flavor and texture. For this recipe, you will need 2 six-count egg molds which will yield one dozen “hard-cooked” eggless eggs. If you only have one mold set, any remaining “yolk” and “egg white” mixture” can be used for crumbled “hard-cooked” eggless egg (superb for topping cold salads) or for eggless egg salad sandwiches.
Please note: The “eggs” cannot be used for heated applications, such as “Scotch eggs”, because the agar will melt and the eggs will turn to mush. They must remain chilled or at room temperature for serving.
About the egg molds: The internet source I was recommending for the egg molds is no longer offering that product, so you will have to do some internet searching for the molds. Many of my readers have found luck locating them on Ebay.com (search for “Jell-O jiggler egg molds”).

Food Processor Ingredients for the “Egg Yolks”
• 5 oz pressed extra-firm block tofu (about one-half of a standard block; do not use silken tofu)
• 2 T refined coconut oil, melted
• 2 T nutritional yeast flakes
• ¼ tsp sodium alginate, guar gum or xanthan gum
Saucepan Ingredients for the “Egg Yolks”
• ½ cup water
• 1 and ½ tsp agar powder
• ½ tsp sweet paprika
• ½ tsp ground turmeric
• ¼ tsp kala namak (Himalayan black salt)
Blender Ingredients for the “Egg Whites”
• 5 oz pressed extra-firm block tofu (about one-half of a standard block; do not use silken tofu)
• 3 cups water
• ½ cup plain unsweetened non-dairy milk
• 4 tsp agar powder
• 1 and ¼ tsp kala namak (Himalayan black salt)
Additional Items Needed
• 2 six-count egg molds
• food processor
• blender
• small saucepan
• a melon baller or ½ T measuring spoon
• small food storage container that will hold about 2 cups
• 2 cup measuring cup with pouring lip
• wax paper or parchment paper
Preparing the “Yolks”
Set the “egg molds” aside. Be sure they are completely snapped together.
Place the food processor ingredients for the “yolks” into a food processor; process into a coarse paste.
Combine the saucepan ingredients for the “yolks” in the saucepan and heat until bubbly over medium heat. Swirl the contents occasionally as the mixture heats.
With the food processor running, pour the molten saucepan mixture into the food chute. Process the entire contents until smooth. Stop as needed to scrape down the sides with a flexible spatula.
Transfer the “yolk” mixture to the food storage container and chill uncovered for a minimum of 1 hour to firm.
Line a plate with wax or parchment paper. Using a melon baller, rounded measuring spoon or similar object, scoop some of the “yolk” mixture into a rough ball shape, about the size of a hardened egg yolk. Roll the mixture between your palms to round the ball and smooth the surface a bit. It doesn’t have to be totally smooth. Set it on the lined plate. Repeat the procedure until you have 12 “yolks”. Make sure the “yolks” are not touching each other on the plate or they will stick together when frozen. This procedure is a bit messy and some of the mixture will stick to your hands, so keep a moist towel nearby. Place the uncovered plate into the freezer for about 1 hour. Avoid freezing for more than 2 hours or ice crystals will form on the “yolks”.
Preparing the “Egg Whites”
When ready to proceed, add the blender ingredients for the “egg whites” to a blender and process until completely liquefied. Add half of the mixture to the saucepan and heat to a soft boil, stirring frequently to avoid scorching. Transfer the hot mixture to the measuring cup with the lip. The mixture may begin to curdle a bit in the measuring cup – this is normal and will not affect the finished flavor or texture. Pour the mixture into the molds, filling them no more than halfway. Let cool at room temperature for 10 minutes to help set the “white” mixture just a bit (this will help keep the yolk suspended, rather than sinking).
Carefully open the molds and place the frozen “yolks” in the center of each “white”. Close the molds and securely snap shut. Make sure they are completely snapped shut or the molten “white” mixture will leak out when topping off.
Pour the remaining “egg white” mixture into the saucepan and bring to a soft boil, stirring frequently. Transfer the mixture to the measuring cup and then fill each egg mold with the mixture to the top of the stems. The mixture may begin to curdle a bit in the measuring cup – this is normal and will not affect the finished flavor or texture. Let settle momentarily and then top off each mold with the mixture (the excess “whites” in the stems can be trimmed away later).
Transfer the molds to the refrigerator and chill for a few hours until completely set. Be careful handling the molds when transferring to the refrigerator so they do not pop open accidentally (for assurance, place the molds on a tray and then transfer to the refrigerator).
Finishing the “Hard-Boiled Eggs”
Open the molds and pop out the “eggs”. There will be a seam on the “eggs” where the molds joined together. Use a dry paper towel to gently rub the “egg” and remove the seam. Trim off the stem ends as needed with a paring knife. Chill the “eggs” in an airtight container until ready to use. The “eggs” should be consumed within 1 week. I’ve never frozen them for storage, so I cannot advise if this can be done successfully without damaging the texture.

Print Recipe
“Hard-Cooked” Eggless Eggs
Votes: 56
Rating: 3.88
You:
Rate this recipe!
|
|
Votes: 56
Rating: 3.88
You:
Rate this recipe!
|
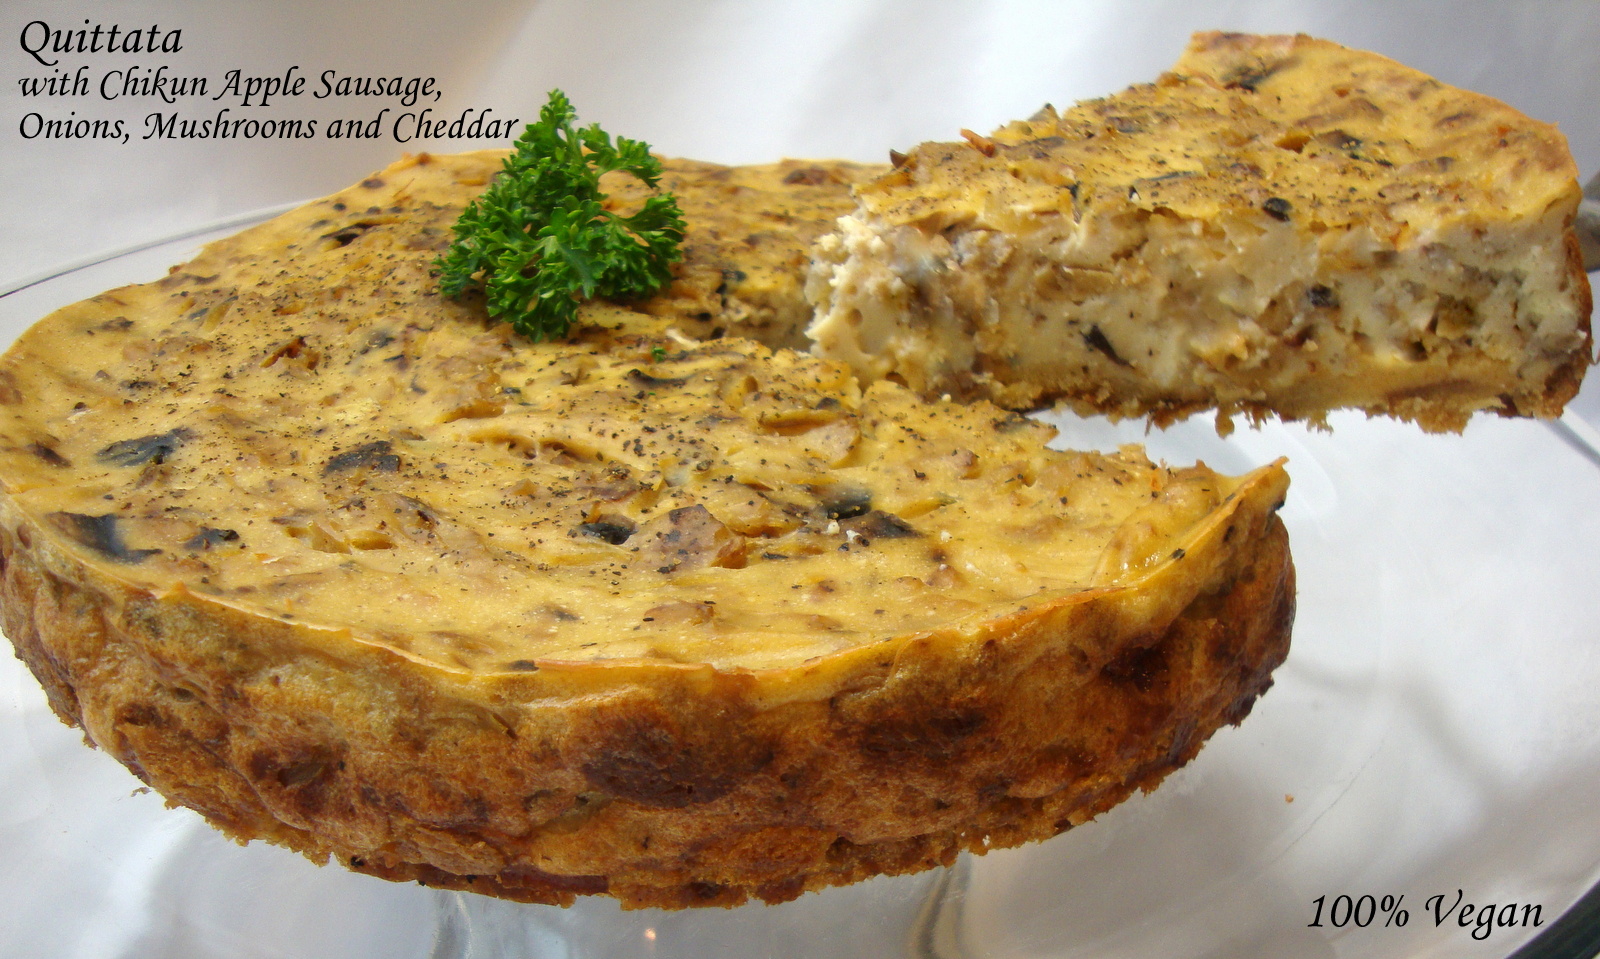 A quittata is a hybrid of a frittata and a quiche. What makes this recipe unique, other than the fact that it’s 100% plant-based, is the savory bread crust (as opposed to using a traditional quiche pastry crust). Tender and flaky pastry crust can be difficult to prepare and personally I find them to be rather bland in flavor. The savory bread crust resolves that problem and requires no baking skills. As the quittata bakes, the exterior crust becomes nice and crispy while the interior remains moist and tender. And unlike a traditional pastry crust, it won’t crumble when sliced, which makes a much nicer presentation.
If you don’t have a springform pan, the quittata can be baked in a casserole dish or baking dish and served as a breakfast/brunch casserole. Seasonings and vegetables can be modified to suit your taste; just be sure any vegetables are cooked sufficiently to remove excess moisture before adding to the eggless custard mixture.
For a traditional eggless quiche or frittata, refer to the “Chef’s Tip” at the bottom of the recipe.
Ingredients for the Eggless Filling
• 2 cartons (12.3 oz. each) Mori-Nu™ extra-firm silken tofu, or similar
• 2 Tbsp olive oil
• ½ medium onion, diced
• 4 oz. mushrooms, any variety, sliced or chopped
• 8 oz. ground vegan sausage (or replace with vegetables of your choice)
• ½ tsp dried thyme
• ¼ tsp coarse ground black pepper
• 6 Tbsp cornstarch or unmodified potato starch
• 4 tsp nutritional yeast flakes
• ¾ tsp kala namak (Himalayan black salt)
Ingredients for the Savory Crust
• 5 to 6 oz. “day old” bread of your choice (about 6 slices, crust intact), cut into small cubes
• ¼ cup non-dairy butter or margarine, melted (plus additional for greasing the springform pan)
• 1 tsp dried marjoram
• ½ tsp dried thyme leaves
• ½ tsp sea salt or kosher salt
• ¼ tsp coarse ground black pepper
• 4 oz. shredded vegan cheese that melts (about 1 and ½ cup)
Additional Item
• 9-inch springform pan (or for a casserole use a baking dish or shallow casserole dish)
Technique
Drain the tofu and slice each block into 4 slabs. Place the slabs on a plate lined with several layers of paper towels or a lint-free kitchen towel to drain for a minimum of 20 minutes. After 20 minutes, blot the surface of the tofu with additional toweling to remove as much moisture as possible. This step is very important or the quittata will fail to set properly.
While the tofu is draining, prepare the crust and the filling. Generously grease the springform pan with butter or margarine and place the pan on a baking sheet. In large mixing bowl, toss the cubed bread with the melted butter, herbs, salt and pepper. Pack the bread mixture into the bottom of the springform pan. Sprinkle the shredded cheese over the top of the bread mixture. Set aside.
Preheat the oven to 375°F.
Add the olive oil to a skillet and place over medium heat. Add the onions, mushrooms, sausage (or vegetables), and a pinch or two of salt. Sauté until the mushrooms have completely released their moisture and the onions are beginning to caramelize. It is essential that the mixture be cooked thoroughly and the excess moisture evaporated or the quittata will fail to set properly. Stir in the thyme and black pepper and set aside to cool.
Crumble the silken tofu into a food processor. Add the starch, nutritional yeast and kala namak. Process the contents until smooth. Transfer the tofu mixture to the mixing bowl. Stir in the skillet mixture and mix thoroughly.
Spoon the filling over the bread and cheese mixture and smooth the surface with the back of the spoon; sprinkle with additional ground black pepper, if desired. Bake uncovered on the middle oven rack for about 1 hour and 10 minutes, or until the top of the quittata is golden. Let the quittata cool for about 15 to 20 minutes to allow it to “set” before removing from the springform pan and transferring to a serving plate. Slice and serve.
If the quittata needs to be reheated, cover securely with foil and heat in the oven at 350°F for 15 to 20 minutes. Slices can also be reheated in the microwave but this will make the crust a bit soggy.
Chef’s Tip: For a traditional eggless quiche, omit the savory bread crust and prebake a 9-inch pastry crust for about 15 minutes at 375°F. Layer 4 oz. of shredded cheese over the bottom of the crust. Add the eggless filling mixture and smooth the top. Bake uncovered on the middle oven rack for about 50 minutes or until golden. Let rest for 15 to 20 minutes to allow it to “set” before slicing and serving.
For a traditional eggless frittata, omit the crust entirely and spoon the eggless filling mixture into a greased 9-inch oven-safe stainless steel skillet or a tart pan with or without a removable bottom. Smooth the surface and top with 4 oz. shredded cheese. Bake at 375°F on the middle oven rack for about 50 minutes or until golden. Let rest for 15 to 20 minutes to allow it to “set” before slicing and serving.
 Fluffy and delicate eggless omelets can be filled with your choice of ingredients. The cooking technique has been simplified from earlier editions of my cookbook, which allows all omelets to be prepared and served at the same time. A standard 9-inch pie plate is required for each omelet (non-stick is not required). This recipe yields 2 omelets, so you will need 2 pie plates to prepare 2 omelets at the same time. For additional omelets, simply double or triple the recipe and use additional pie plates for each omelet (most large ovens can accommodate 6 pie plates with three on each rack). This is a foolproof method of preparation with no-risk of scorching or undercooking, so don’t be intimated to try it.
Ingredients
• 1 carton (12.3 oz.) Mori-Nu™ extra-firm silken tofu, or similar
• 3 Tbsp cornstarch or unmodified potato starch
• 1 Tbsp non-dairy butter (from my cookbooks) or commercial vegan margarine, softened or melted
• 1 T nutritional yeast flakes
• ½ tsp kala namak (Himalayan black salt) – or sea salt or kosher salt if you prefer
• ⅛ tsp onion powder
• ⅛ tsp sweet paprika
• ⅛ tsp turmeric
• fillings, toppings and garnishes of your choice
Tip: Cheese Melts (from The Non-Dairy Evolution Cookbook) work beautifully for omelets since the cheese is already melted. Shredded block cheeses (from the same cookbook) can be added to the cooked filling mixture while still warm to assist melting before filling the omelet.
Technique
Remove the tofu from the carton. Slice the tofu into 4 slabs and place the slabs on a plate lined with several layers of paper towels or a lint-free kitchen towel to drain for a minimum of 20 minutes. Firmly blot the tofu with additional towels to remove as much moisture as possible. This step is very important or the omelets will not set properly.
Crumble the tofu into a food processor* and add the starch, nutritional yeast, butter or margarine, kala namak, onion powder and turmeric. Process the contents until smooth. The ingredients will form a thick, pale cream (the egg color will develop when the mixture is cooked). Transfer the mixture to a bowl and set aside while the oven is preheated and any fillings are prepared.
*A blender can be used, but the mixture will be thick and difficult to retrieve from around the blades; therefore a food processor is recommended for ease of preparation.
Preheat the oven to 375°F/190°C. If using a convection oven, reduce the heat by 25°F/10°C.
When using vegetables that have high moisture content, such as mushrooms, spinach, zucchini, diced tomatoes, etc., be sure to sauté them until they have released most of their liquid. Transfer the vegetables and other fillings to a separate bowl and set aside. If using shredded cheese, mix the shreds with the warm filling to assist melting before filling the omelet.
Lightly mist the pie plate(s) with cooking oil spray. Add half of the mixture (about ¾ cup) to each plate. With the back of large spoon or flexible spatula, pat and spread the mixture evenly to the interior edges of the plate. Place the pie plates, uncovered, into the oven and bake for 10 minutes.
Test the omelets by touching the center; the center should feel dry to the touch. If it feels gooey, bake an additional minute or two until just dry to the touch. Remove from the oven and spoon the filling onto one side of the omelet. With a flexible spatula, carefully lift the opposite side of the omelet over the filling. Return the omelet(s) to the oven for 3 minutes.
Slide the omelet(s) onto a serving plate and top and/or garnish as desired. Serve immediately.
Print Recipe
Eggless Egg Omelets (New Method)
Votes: 8
Rating: 4.63
You:
Rate this recipe!
|
|
Votes: 8
Rating: 4.63
You:
Rate this recipe!
|
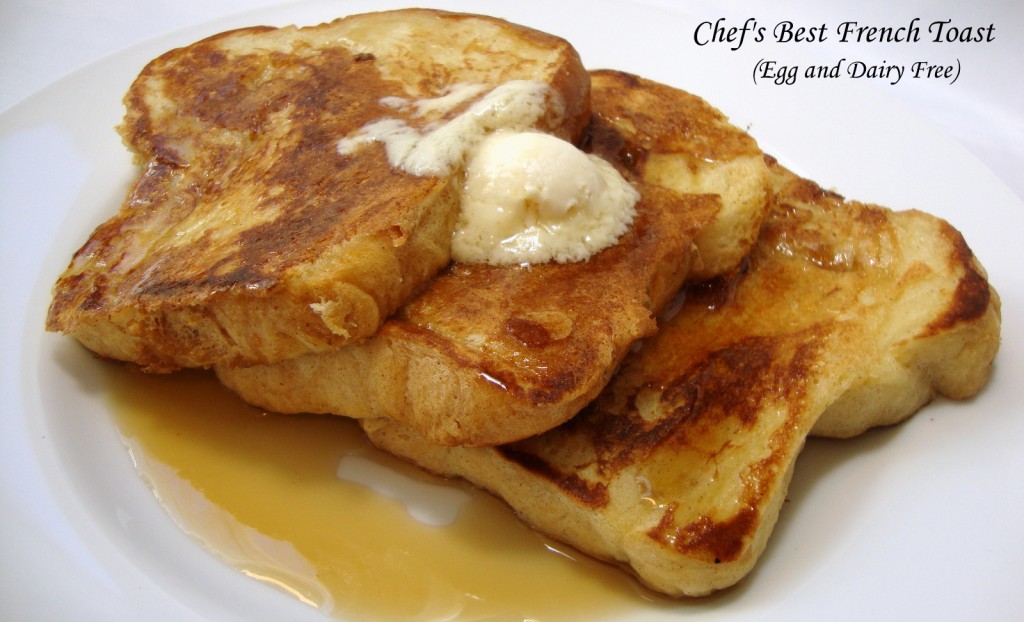 French toast is a classic breakfast and brunch favorite. My egg and dairy-free version consists of sliced bread dipped in a special eggless egg batter, pan-fried until golden brown and garnished with toppings of your choice.
Primary Ingredients
• 6 slices of bread*
• cooking oil
• toppings of your choice, such as non-dairy butter or margarine, real maple syrup, coconut syrup, fruit syrup, jam or marmalade; or top with fruit compote and dust with organic powdered sugar
*Bread that is a day or two old is best (but not stale). Whole grain bread has a heartier texture but I’m a traditionalist and prefer thick slices of homemade white bread.
Batter Ingredients
• ½ carton (about 6 oz.) Mori-Nu™ extra-firm silken tofu, or similar
• ¾ cup plain or vanilla non-dairy milk
• 3 T unmodified potato starch, cornstarch or arrowroot flour
• 1 T nutritional yeast flakes
• 1 T mild vegetable oil
• 1 T organic sugar, maple syrup or brown rice syrup
• 1 tsp real vanilla extract
• pinch of fine sea salt or kosher salt
• optional: ½ tsp cinnamon (or try pumpkin pie spice)
Technique
Carefully slide the silken tofu from the carton. Slice the tofu in half, reserving one half for other uses. Place the half block of tofu on a plate lined with a few paper towels or a lint-free kitchen towel and let drain for 10 minutes.
Crumble the tofu into a blender, add the remaining batter ingredients and process until completely smooth. Pour the blender mixture into a pie plate or wide, shallow dish.
Add 2 tablespoons cooking oil to a non-stick skillet. Crumple a paper towel and wipe the oil around the skillet (reserve the oily paper towel to re-wipe the skillet in between batches of French toast). Place the skillet over medium-low heat. The key to this recipe is to cook the toast low and slow so the batter cooks through without scorching. In other words, don’t use high heat.
Dip a bread slice briefly into the batter. Coat both sides but do not soak. Gently shake the slice of bread to remove excess batter. Add the bread slice to the skillet and repeat with another slice. Fry until golden brown on each side (if the toast is taking an excessively long time to brown, the heat may be too low; increase the heat slightly).
Test each piece in the center with your finger to make sure the batter is cooked through and toast has firmed up. Transfer to a plate and place in a low oven while repeating the process with additional slices. Re-wipe the skillet with the oily paper towel before adding more battered bread (add a little more oil if needed).
Serve hot with a dab of non-dairy butter or margarine and the toppings of your choice.
Print Recipe
Chef's Best French Toast
Votes: 8
Rating: 4.88
You:
Rate this recipe!
|
|
Votes: 8
Rating: 4.88
You:
Rate this recipe!
|
Corned Beaf Hash topped with Sunny-Side Ups
Top the Corned Beaf Hash with Sunny-Side Ups, Over-Easys or Eggless Scramble from The Non-Dairy Formulary.
Ingredients:
• 3 T Better Butter (from either of my cookbooks) or vegan margarine
• 1 small onion, finely diced (about ⅔ cup)
• 2 tsp minced garlic (2 cloves)
• 8 to 10 oz. Corned Beaf (from The Gentle Chef Cookbook)
• 1 can (14.5 oz.) whole new potatoes or
1 lb. potatoes of choice, peeled, cut into chunks and boiled until tender
• sea salt or kosher salt and coarse ground black pepper to taste
• 2 T finely chopped fresh parsley
Technique:
Finely dice the potatoes and set aside. Dice the corned beaf or pulse in a food processor until minced. Set aside.
Melt the butter or margarine in a large non-stick or cast iron skillet over medium heat. Add the onion and sauté until translucent. Add the garlic and sauté an additional minute.
Mix in the corned beaf, potatoes and parsley. Spread out evenly over the pan. Increase the heat to medium-high and press down on the mixture with a spatula.
Do not stir the mixture. The goal is to achieve browning. After a few minutes, use the spatula to flip sections over in the skillet to brown the opposite side. Press down again with the spatula. If the mixture is sticking, add a little more butter or margarine to the pan. Continue to cook in this manner until the potatoes and the corned beaf are nicely browned.
Remove from heat and salt and pepper to taste.
Print Recipe
Corned Beaf Hash
Votes: 1
Rating: 3
You:
Rate this recipe!
|
|
Votes: 1
Rating: 3
You:
Rate this recipe!
|