Vegan Eggz Essentials – Chef’s Proprietary Formula
Basic skillet-cooked eggz whites with broken yolx, sautéed baby spinach and tofu bacon.
Regrettably, due to supply chain issues, Modernist Pantry has discontinued my own Vegan Eggz Essentials product, which consisted of two individual ingredients (Eggz Essentials A and Eggz Essentials B), conveniently packaged and sold together. These two ingredients are used in several recipes in my cookbooks, most notably my egg analogue recipes in Cook and Let Live.
While I’m disappointed that my product is no longer available, the individual ingredients are still available for separate purchase from a few sources. I have decided to publish my formula for your convenience. I’ve also included a basic eggz scramble recipe and an eggz white only recipe. Whenever you come across a recipe in my cookbooks that call for these ingredients, now you have the substitute.
Eggz Essentials A is a specific form of methylcellulose (plant fiber). Methylcellulose is the food science name for purified plant cellulose or fiber. Like cellulose, it is non-digestible, non-toxic, and non-allergenic. Methylcellulose, as an ingredient in food, has the unique property of setting when hot, which makes it particularly useful for preparing egg analogues. Methylcellulose is sold under a variety of names and in a variety of forms, and each form reacts differently in cooking. In my recipes, it can only be replaced with:
- Methocel® A4C Food Grade (methylcellulose A4C) available from ModernistPantry.com, Amazon.com, and potentially other online sources; or
- Methylcellulose HV or LV (high viscosity/low viscosity) available from Modernist Pantry.com, Amazon.com, and potentially other online sources. In Europe, methylcellulose HV is identified as methylcellulose e-461.
Eggz Essentials B (formerly high-acyl gellan gum) is being replaced with kappa carrageenan. Kappa carrageenan functions in a similar manner to gellan gum in this application; is more affordable; and is much easier to access. Kappa carrageenan, which is derived from seaweed, is commonly used in vegan cheesemaking.
Scrambled Eggz
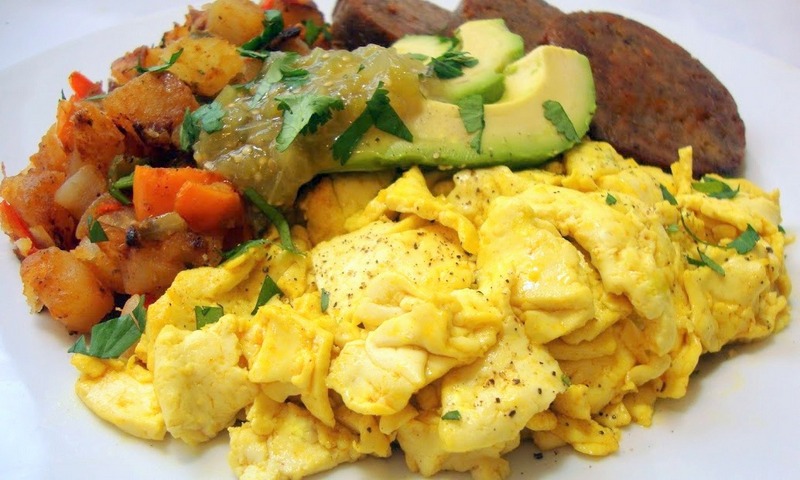
Cooked scrambled eggz bear a remarkable resemblance to real cook scrambled eggs – with no tofu required. The eggz mixture consists of Vegan Eggz Essentials blended with plain non-dairy milk and other natural ingredients for flavor and color and the mixture is cooked just as you would real beaten eggs.
The scrambled eggz mixture needs to be blended and refrigerated for a minimum of 2 hours for proper setting when cooked, so plan accordingly. For breakfast preparation convenience, blend and chill the eggz mixture the night before.
Please note that the scrambled eggz mixture is only intended for preparing scrambled eggz and omelets; as a binder in some cooked foods; or when used as an eggz dip for battering or breading (dilute with plain non-dairy milk to thin the viscosity). The formula needs to be customized for eggz quiches and frittatas by adding 2 tablespoons of cornstarch or potato starch to the mixture.
The scramble mixture will not work as an egg replacer in baked goods (breads, cakes, muffins, etc), or in other recipes that rely on the protein structure of eggs to create lift (such as soufflés). For baked goods you may want to experiment with aquafaba, commercial egg replacers, flaxseed emulsion, bananas or applesauce.
After the eggz have set, try folding in some shredded non-dairy cheese that melts before serving. If desired, top with sautéed vegetables; chopped herbs; or slices of fresh avocado and salsa. For a classic American breakfast, serve with hash browns, vegan bacon or sausages and whole grain toast with non-dairy butter. For the best texture experience, serve hot! This recipe yields about 4 servings.
Eggz Ingredients
- 2 cups (480 ml) plain unsweetened non-dairy milk
- 2 Tablespoons Eggz Essentials A (methylcellulose; see above description)
- 1 T nutritional yeast flakes
- 2 teaspoons Eggz Essentials B (kappa carrageenan)
- 1 teaspoon kala namak (Himalayan black salt)
- scant ¼ teaspoon paprika
- scant ¼ teaspoon ground turmeric
Preparation
Add the eggz ingredients to a blender and process for 20 seconds (a mini-blender is ideal for this purpose). An immersion blender can also be used. The mixture will be pale in color (the “egg” color will develop when the mixture is cooked). Resist adding more turmeric or paprika as this will create a very unnatural finished color appearance. Please note that the raw mixture will be thicker than real beaten eggs.
Transfer the mixture to a sealable container and chill for a minimum of 2 hours. This is essential in order for the mixture to set properly when cooked. The blended mixture can be stored in the refrigerator for up to 1 week and then used to prepare scrambles at your convenience. After chilling, the mixture will be quite thick and somewhat gelatinous. Before using, stir vigorously to loosen the mixture and break up any air bubbles that formed during blending. If the mixture has been chilled for extended periods, let it warm up to room temperature a bit. This will also help loosen the mixture and improve flow.
Mist a non-stick skillet with cooking oil or melt a tablespoon or two of non-dairy butter or margarine over medium-low gas flame (electric stoves may require a higher setting to heat the skillet sufficiently). Spread the desired amount of the eggz mixture in the skillet (½ cup for each serving). Increase the heat to medium.
After thirty seconds, push against the edge of the mixture with a flexible spatula to test for setting. If still liquid check again in thirty seconds. Once the mixture begins to set, push and fold the edges in towards the center with a flexible spatula. Break up the mixture with the edge of the spatula and continue to fold and cook until the eggz are set. Plate, season and garnish as desired; serve immediately.
Eggz Whites
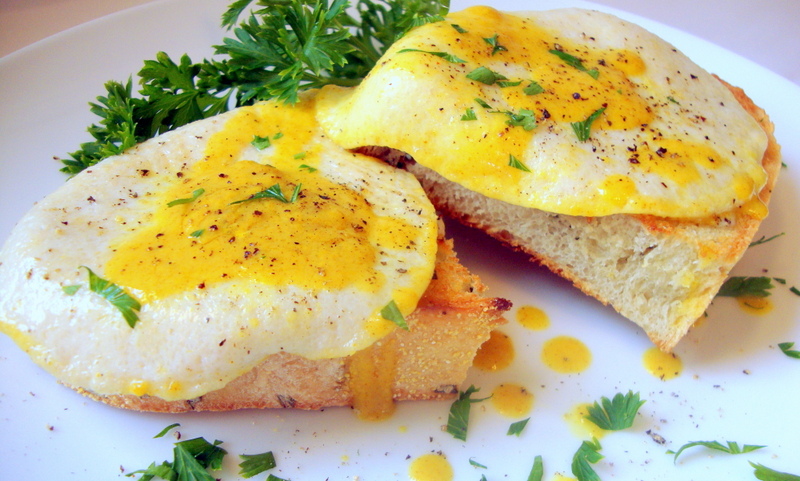
Cooked eggz whites bear a remarkable resemblance in appearance, flavor and texture to real cooked egg whites. Eggz whites can be used for preparing skillet-cooked eggz, oven-cooked eggz, and eggz whites omelets. Cold-served eggz, such as deviled eggz, are prepared differently using agar as a setting agent (please see appropriate recipes in my cookbooks). Eggz whites consist of Vegan Eggz Essentials blended with plain non-dairy milk and kala namak to impart the characteristic egg-like flavor and aroma. No tofu is required.
The eggz whites mixture needs to be blended and refrigerated for a minimum of 2 hours before cooking, so plan accordingly. For breakfast preparation convenience, blend and chill the eggz mixture the night before. This recipe yields 5 to 6 eggz whites (the recipe can be doubled or tripled if desired).
Please note that the eggz whites mixture is only intended for preparing skillet-cooked eggz, oven-cooked eggz, and eggz whites scrambles and omelets. While it will work as a binder in some cooked foods, it doesn’t have the structure for creating fluffy meringues (aquafaba is recommended for meringues). It also will not work as an egg white replacer in baked goods (breads, cakes, muffins, etc.) or in other recipes that rely on the protein structure of eggs to create lift (such as soufflés). For baked goods you may want to experiment with aquafaba, commercial egg replacers or flaxseed emulsion.
Ingredients
- 1 cup plain unsweetened non-dairy milk
- 1 Tablespoon Eggz Essentials A (methylcellulose; see above description)
- 1 teaspoon Eggz Essentials B (kappa carrageenan)
- ½ teaspoon kala namak (Himalayan black salt)
Preparation
Add the ingredients to a blender and process for 20 seconds (a mini blender is ideal for this purpose). An immersion blender can also be used. Please note that the raw eggz whites mixture will be opaque and much creamier and thicker than real egg whites.
Transfer the mixture to a sealable container and chill for a minimum of 2 hours. This is essential in order for the mixture to set properly when cooked. The blended mixture can be stored in the refrigerator for up to 1 week and then used at your convenience. After chilling, the mixture will be quite thick and somewhat gelatinous. Before using, stir vigorously to loosen the mixture and break up any air bubbles that formed during blending. If the mixture has been chilled for extended periods, let it warm up to room temperature a bit. This will also help loosen the mixture and improve flow.
Cooking the Eggz Whites
Mist a non-stick or cast-iron skillet with cooking oil over a medium-low gas flame. If using an electric stove, a higher setting may be needed to preheat the skillet sufficiently.
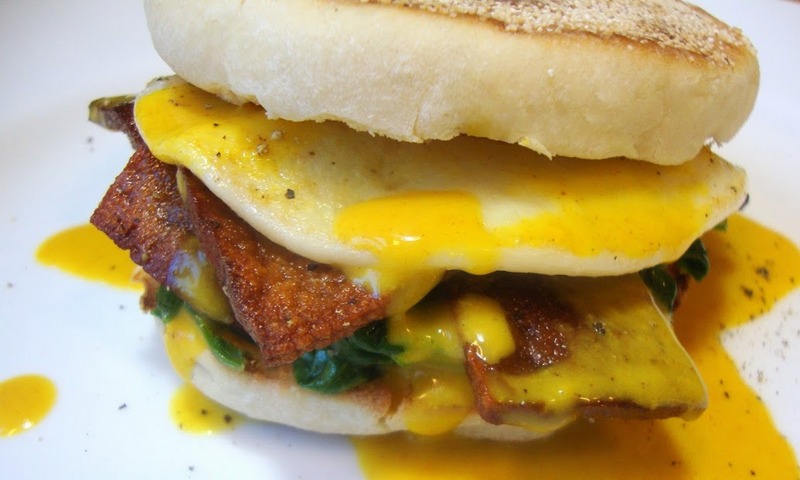
Vigorously stir the chilled eggz whites to loosen the mixture and remove any air bubbles. For each eggz white, spoon 2 generous tablespoons of the mixture into the skillet. If necessary, use the back of a spoon to spread the mixture into a circular or oval shape. Increase the heat to medium and cook until the whites are firm to the touch. Flip the eggz with a flexible spatula and cook for another 10 to 15 seconds. Transfer to a serving plate, drizzle with the broken yolx mixture (recipe follows) and season and garnish as desired. Serve immediately.
Broken Yolx
Broken yolx is a rich, golden liquid egg yolk alternative that remarkably resembles lightly cooked egg yolk. It’s superb for drizzling over cooked eggz whites or silken tofu to create a “broken yolk” effect. It’s also wonderful for dipping toast, vegan bacon or sausage. This recipe yields about 1 cup. The recipe can be doubled if desired and stored in the refrigerator for up to 7 days and then reheated at your convenience.
Ingredients
- 2 Tablespoons nutritional yeast flakes
- ¾ teaspoon sodium alginate, guar gum or xanthan gum
- ½ teaspoon ground turmeric
- ½ teaspoon paprika
- ¼ teaspoon kala namak (Himalayan black salt)
- 2 Tablespoons non-dairy butter or margarine
- 1 cup plain unsweetened non-dairy milk
Preparation
In a small dish, combine the nutritional yeast, alginate or gum, turmeric, paprika and kala namak. In a small saucepan, melt the butter or margarine over low heat. Whisk in the mixed dry ingredients to create a paste. In small increments, whisk in the milk until smooth. Increase the heat to medium-low and stir occasionally until the mixture is heated through. Reduce the heat back to low to keep warm until ready to serve, stirring occasionally.
Print Recipe
Vegan Eggz Essentials - Chef's Proprietary Formula
Votes: 0
Rating: 0
You:
Rate this recipe!
|
|
Votes: 0
Rating: 0
You:
Rate this recipe!
|
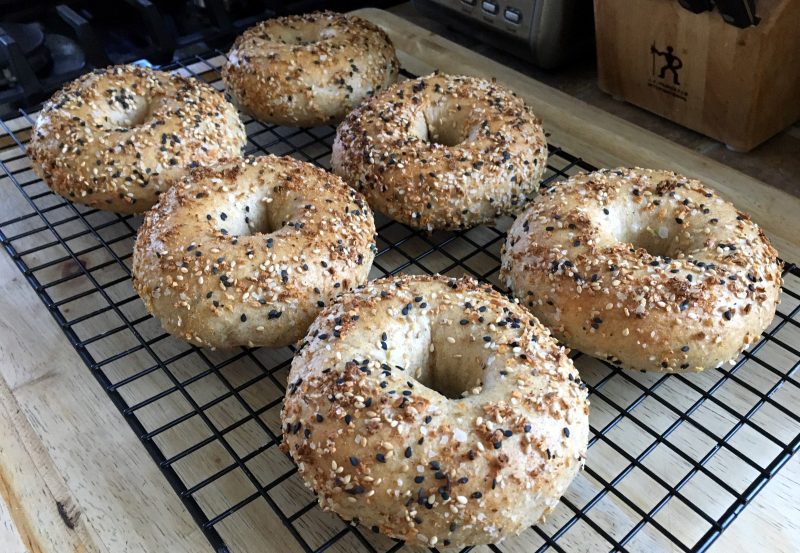
Originating in the Jewish communities of Poland, bagels are a yeasted wheat bread traditionally shaped by hand into the form of a ring, boiled for a short time in alkalinized water and then baked until golden. They can be made plain or seasoned.
Dough Ingredients
- 240 grams/ml (1 cup) lukewarm water
- 1 packet rapid rise instant yeast (2¼ teaspoons)
- 2 teaspoons organic sugar
- 400 grams bread flour*
- 2 tablespoons neutral vegetable oil
- 2 teaspoons sea salt or kosher salt
*To enrich with whole wheat, use 300 grams bread flour and 100 grams whole wheat flour.
Simmering Bath
- 3 quarts water
- ¼ cup barley malt syrup, real maple syrup, brown rice syrup or agave syrup
- 1 teaspoon baking soda
Optional Toppings of Choice
- sesame seeds
- poppy seeds
- everything bagels: combination of poppy seeds, sesame seeds, dried minced onion, granulated garlic, and coarse sea salt or kosher salt
Preparation
If using, scatter the bagel toppings on a plate; set aside.
Whisk together the warm water, yeast and sugar in the bowl of a stand mixer fitted with a dough hook. Add the flour, vegetable oil and salt and process on low speed until elastic, about 6 minutes. The dough may wrap around the hook while processing; simply stop the motor, push the dough off the hook with a narrow spatula and continue processing. Mixing and kneading can also be done by hand. Shape the sticky dough into a ball and place into a roomy, lightly oiled container, loosely cover and let rise for 1 hour, or until doubled in size.
Divide the dough into 6 roughly equal pieces (for uniformity in size, weigh the dough and then divide by 6). Roll each piece into a ball. To form the bagels, slightly flatten the balls of dough with the palm of your hand. Pick up a portion and poke a hole into the center with a fingertip, then using your forefingers and middle fingers, gently stretch from the interior into a 3-inch interior diameter while rotating the ring of dough in your hand. Set aside on a lightly floured work surface. Repeat with the remaining portions. Shaping takes practice, so be patient with yourself.
Let the bagels rise again for 30 minutes while preparing the water bath.
Bring 3 quarts of water to a boil in large cooking pot and add the chosen sweetener and the baking soda. Preheat the oven to 450˚F/230˚C.
Reduce the boil to a vigorous simmer, add 3 bagels and simmer for 1 minute. Flip the bagels over with a slotted spoon and simmer another minute. Remove with the slotted spoon to a baker’s rack to drain briefly. Repeat the simmering with the remaining 3 bagels. When cool enough to handle, lightly press the top and sides of the bagels into the topping of choice and place on a baking sheet lined with parchment or a silicone baking mat. Avoid rough handling to prevent deflation.
Bake on the middle oven rack for 17 to 20 minutes or until golden brown. Transfer to the wire rack to cool completely. Store at room temperature in a sealed bag or container. To serve, slice horizontally through the center. Toast until lightly browned. Top with a “schmear” of vegan butter or cream cheese as desired.
Votes: 0
Rating: 0
You:
Rate this recipe!
|
|
Votes: 0
Rating: 0
You:
Rate this recipe!
|
 This cheesy, creamy and mildly tangy seasoning powder was created specifically for dusting pre-salted potato chips and popcorn. For unsalted chips and popcorn, consider increasing and even doubling the amount of salt in the recipe. Freeze-dried minced chives can be added for a “loaded baked potato” flavor. This recipe yields about 1 cup of seasoning.
Ingredients
• ¾ cup nutritional yeast flakes
• ¼ cup organic soymilk powder (do not use soy protein powder or soy flour)
• 3 T tomato powder
• 2 T onion powder
• 4 tsp fine sea salt or kosher salt, or more to taste
• 1 and ½ tsp lactic acid powder (available from ModernistPantry.com)
• ½ tsp dry ground mustard
• ⅛ tsp garlic powder
Preparation
Process the ingredients in a DRY blender until finely powdered. Store the seasoning blend in an airtight container at room temperature in a cool, dry place for up to 6 months (but you’ll never keep it around that long!)
To season a large bag of commercial potato chips, open the bag and add about 3 tablespoons of seasoning. Close the bag tightly and gently shake and turn to distribute the seasoning. Open the bag and enjoy.
Alternately, add the seasoning powder to a shaker dispenser and season your favorite foods and snacks according to taste.
Loaded Baked Potato Variation
Process the ingredients in a DRY blender until finely powdered. Add 1 tablespoon freeze-dried minced chives and process again until the chives are reduced to small particles but not completely powdered. Season the chips as directed above.
Print Recipe
Cheddar and Sour Cream Potato Chip Seasoning
Votes: 59
Rating: 4.12
You:
Rate this recipe!
|
|
Votes: 59
Rating: 4.12
You:
Rate this recipe!
|
 Vodka blush sauce is a creamy tomato-based pasta sauce flavored with vodka. This is my own variation which can be prepared with either cashew cream or soy cream. Sweet red pepper was included for flavor. For the photo, I used torchiette pasta rather than the traditional penne pasta.
Ingredients
• ¼ cup whole raw cashews*
• ½ cup water*
• 2 T olive oil
• 1 medium onion, peeled and chopped
• 1 large sweet red pepper, seeded and chopped
• 3 cloves garlic, chopped
• 1 can (28 oz) diced tomatoes with liquid
• ¼ cup premium vodka
• 2 T tomato paste
• 1 tsp dried basil leaves
• 1 tsp fine sea salt or kosher salt, or more to taste
• ½ tsp dried oregano leaves
• ½ tsp crushed red pepper flakes
• grated non-dairy parmesan
• julienned fresh sweet basil for garnish (optional)
• fresh ground black pepper, to taste
• cooked pasta of your choice (penne is commonly used)
*or ½ cup basic Soy Cream (from the Non-Dairy Evolution Cookbook or Seitan and Beyond Cookbook)
Preparation
In a blender, process the cashews and water on high speed for 2 full minutes. Transfer to a cup and chill until ready to use. Alternately, the cashew cream mixture can be replaced with ½ cup soy cream.
Add the olive oil to a skillet and place over medium heat. Add the onions and sweet red pepper and sauté until the onions are translucent. Add the garlic and sauté an additional minute or two.
Stir in the diced tomatoes with liquid, vodka, tomato paste, dried basil, salt, dried oregano and the red pepper flakes. Bring to a gentle simmer and cover the skillet. Reduce the heat to low and cook for 45 minutes, stirring occasionally.
Transfer the skillet mixture to the blender. Begin processing on low speed, gradually increasing to high. Process the contents until smooth and then transfer back to the skillet, placing over medium heat.
Stir in the cashew or soy cream and cook until heated through. Season the sauce with additional salt as needed to taste. Ladle the sauce over cooked pasta, sprinkle with parmesan and fresh ground black pepper and garnish with the optional fresh basil.
Print Recipe
Vodka Blush Sauce
Votes: 14
Rating: 3.5
You:
Rate this recipe!
|
|
Votes: 14
Rating: 3.5
You:
Rate this recipe!
|
Bacun grease is essentially a flavored vegetable shortening. Use for any cooking purpose just as you would real bacon grease; store in an airtight container in the refrigerator and use within 1 year. This recipe yields 1 cup.
Ingredients
• ⅔ cup organic refined coconut oil
• ⅓ cup vegetable oil
• 1 and ½ tsp tamari, soy sauce or Bragg Liquid Aminos™
• 1 tsp dark brown sugar or real maple syrup
• ½ tsp liquid smoke
• ¼ tsp coarse ground black pepper
• ¼ tsp guar gum or xanthan gum (acts as an emulsifier and stabilizer; do not omit!)
Preparation
Melt and measure the coconut oil.
Process all ingredients in a mini-blender or in a heavy measuring cup using an immersion blender until emulsified.
Transfer to a sealable container and freeze until hardened and then transfer to the refrigerator for storage until ready to use.
Print Recipe
Bacun Grease
Votes: 30
Rating: 4.13
You:
Rate this recipe!
|
|
Votes: 30
Rating: 4.13
You:
Rate this recipe!
|
 Important! This recipe should only be used if you wish to prepare solid “hard-cooked” eggless eggs. If you wish to prepare vegan deviled “eggs” or eggless “egg” salad, please see the appropriate recipe in this blog or in my Non-Dairy Evolution Cookbook, as these recipes are much less involved and easier to prepare.
This is my own recipe and technique for producing “hard-cooked” eggless eggs that are remarkably similar to their egg counterparts in appearance, flavor and texture. For this recipe, you will need 2 six-count egg molds which will yield one dozen “hard-cooked” eggless eggs. If you only have one mold set, any remaining “yolk” and “egg white” mixture” can be used for crumbled “hard-cooked” eggless egg (superb for topping cold salads) or for eggless egg salad sandwiches.
Please note: The “eggs” cannot be used for heated applications, such as “Scotch eggs”, because the agar will melt and the eggs will turn to mush. They must remain chilled or at room temperature for serving.
About the egg molds: The internet source I was recommending for the egg molds is no longer offering that product, so you will have to do some internet searching for the molds. Many of my readers have found luck locating them on Ebay.com (search for “Jell-O jiggler egg molds”).

Food Processor Ingredients for the “Egg Yolks”
• 5 oz pressed extra-firm block tofu (about one-half of a standard block; do not use silken tofu)
• 2 T refined coconut oil, melted
• 2 T nutritional yeast flakes
• ¼ tsp sodium alginate, guar gum or xanthan gum
Saucepan Ingredients for the “Egg Yolks”
• ½ cup water
• 1 and ½ tsp agar powder
• ½ tsp sweet paprika
• ½ tsp ground turmeric
• ¼ tsp kala namak (Himalayan black salt)
Blender Ingredients for the “Egg Whites”
• 5 oz pressed extra-firm block tofu (about one-half of a standard block; do not use silken tofu)
• 3 cups water
• ½ cup plain unsweetened non-dairy milk
• 4 tsp agar powder
• 1 and ¼ tsp kala namak (Himalayan black salt)
Additional Items Needed
• 2 six-count egg molds
• food processor
• blender
• small saucepan
• a melon baller or ½ T measuring spoon
• small food storage container that will hold about 2 cups
• 2 cup measuring cup with pouring lip
• wax paper or parchment paper
Preparing the “Yolks”
Set the “egg molds” aside. Be sure they are completely snapped together.
Place the food processor ingredients for the “yolks” into a food processor; process into a coarse paste.
Combine the saucepan ingredients for the “yolks” in the saucepan and heat until bubbly over medium heat. Swirl the contents occasionally as the mixture heats.
With the food processor running, pour the molten saucepan mixture into the food chute. Process the entire contents until smooth. Stop as needed to scrape down the sides with a flexible spatula.
Transfer the “yolk” mixture to the food storage container and chill uncovered for a minimum of 1 hour to firm.
Line a plate with wax or parchment paper. Using a melon baller, rounded measuring spoon or similar object, scoop some of the “yolk” mixture into a rough ball shape, about the size of a hardened egg yolk. Roll the mixture between your palms to round the ball and smooth the surface a bit. It doesn’t have to be totally smooth. Set it on the lined plate. Repeat the procedure until you have 12 “yolks”. Make sure the “yolks” are not touching each other on the plate or they will stick together when frozen. This procedure is a bit messy and some of the mixture will stick to your hands, so keep a moist towel nearby. Place the uncovered plate into the freezer for about 1 hour. Avoid freezing for more than 2 hours or ice crystals will form on the “yolks”.
Preparing the “Egg Whites”
When ready to proceed, add the blender ingredients for the “egg whites” to a blender and process until completely liquefied. Add half of the mixture to the saucepan and heat to a soft boil, stirring frequently to avoid scorching. Transfer the hot mixture to the measuring cup with the lip. The mixture may begin to curdle a bit in the measuring cup – this is normal and will not affect the finished flavor or texture. Pour the mixture into the molds, filling them no more than halfway. Let cool at room temperature for 10 minutes to help set the “white” mixture just a bit (this will help keep the yolk suspended, rather than sinking).
Carefully open the molds and place the frozen “yolks” in the center of each “white”. Close the molds and securely snap shut. Make sure they are completely snapped shut or the molten “white” mixture will leak out when topping off.
Pour the remaining “egg white” mixture into the saucepan and bring to a soft boil, stirring frequently. Transfer the mixture to the measuring cup and then fill each egg mold with the mixture to the top of the stems. The mixture may begin to curdle a bit in the measuring cup – this is normal and will not affect the finished flavor or texture. Let settle momentarily and then top off each mold with the mixture (the excess “whites” in the stems can be trimmed away later).
Transfer the molds to the refrigerator and chill for a few hours until completely set. Be careful handling the molds when transferring to the refrigerator so they do not pop open accidentally (for assurance, place the molds on a tray and then transfer to the refrigerator).
Finishing the “Hard-Boiled Eggs”
Open the molds and pop out the “eggs”. There will be a seam on the “eggs” where the molds joined together. Use a dry paper towel to gently rub the “egg” and remove the seam. Trim off the stem ends as needed with a paring knife. Chill the “eggs” in an airtight container until ready to use. The “eggs” should be consumed within 1 week. I’ve never frozen them for storage, so I cannot advise if this can be done successfully without damaging the texture.

Print Recipe
“Hard-Cooked” Eggless Eggs
Votes: 56
Rating: 3.88
You:
Rate this recipe!
|
|
Votes: 56
Rating: 3.88
You:
Rate this recipe!
|