A savory dip made from scratch with caramelized onions and leeks. Serve with crudités, chips or crackers. This recipe yields about 2 and ½ cups.
Ingredients
• 2 T olive oil
• 1 large sweet yellow onion, peeled
• 1 medium leek, white and light green part only
• 2 cloves garlic, minced (2 tsp)
• 1 T tamari, soy sauce, tamari or Bragg Liquid Aminos™
• 1 tsp vegan Worcestershire Sauce
• ¼ tsp coarse ground black pepper, or more taste
• ¼ tsp dried thyme leaves
• 1 cup non-dairy sour cream
• 1 cup vegan mayonnaise
• sea salt or kosher salt to taste, if needed
• chopped parsley for garnish (optional)
Preparation
Slice the onions very thin (a mandoline is very helpful) and then chop. Split the leek lengthwise; rinse well to remove any sand and then thinly slice crosswise into “half-moons”.
Add the olive oil to a non-stick skillet and place over medium heat. Add the onions and leeks and a pinch of salt and sauté until golden.
Add the garlic, tamari, Worcestershire, black pepper and thyme and continue to sauté until the vegetables are very soft and nicely caramelized. Transfer to a container and refrigerate until chilled.
In a medium mixing bowl, combine the caramelized onion and leek mixture with the sour cream and mayonnaise and mix well. Taste and add salt as needed and additional pepper to taste. Transfer to a serving bowl, cover and chill to blend the flavors. Garnish with chopped parsley before serving if desired.
Print Recipe
French Onion and Leek Dip
Votes: 81
Rating: 4.37
You:
Rate this recipe!
|
|
Votes: 81
Rating: 4.37
You:
Rate this recipe!
|
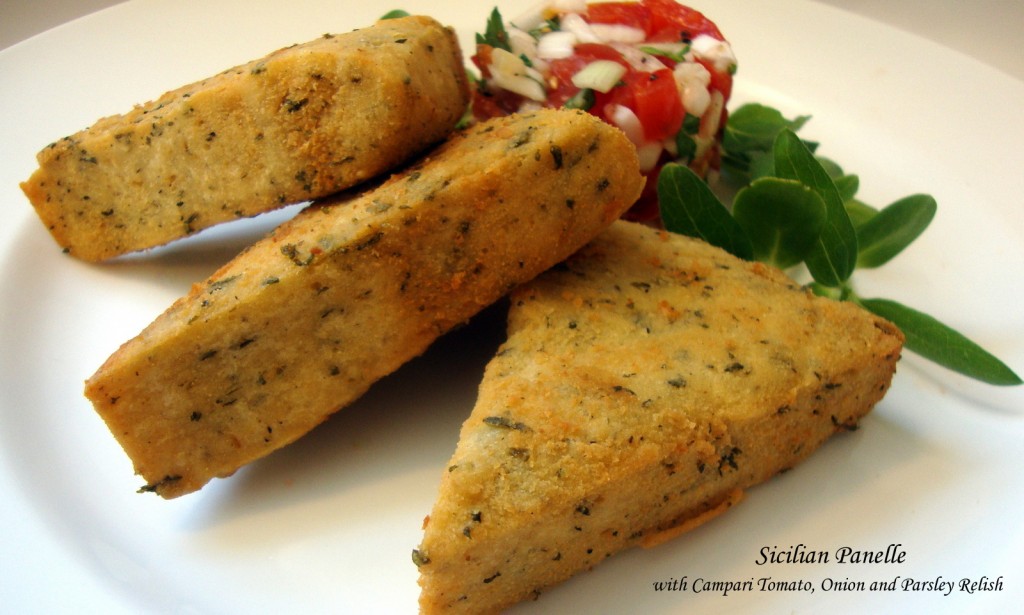 Panelle, also known as Panella di Ceci, are Sicilian fritters made from chickpea flour and seasonings and are similar to fried polenta. They are a popular street food in Palermo and are often eaten between slices of bread or on a roll, like a sandwich. Panelle are believed to be of Arabic origin. The panelle can be cut into various shapes and sizes before frying.
Ingredients for the Panelle
• 1 cup chickpea flour
• 2 T dried parsley flakes
• 1 tsp onion powder
• 1 tsp dried basil
• ½ tsp garlic powder
• 2 cups water
• 2 T olive oil
• 1 tsp sea salt or kosher salt
• high-temp cooking oil for frying
Ingredients for the Relish (optional)
Mix together in a bowl:
• 3 campari tomatoes, seeded and diced
• 3 T finely diced onion
• 3 T finely chopped flat leaf parsley
• 2 tsp olive oil
• 2 tsp fresh lemon juice
• sea salt or kosher salt and fresh ground black pepper to taste
Preparation
Oil and 8”x8” baking dish or line with parchment paper. Set aside.
Combine the chickpea flour, parsley, onion powder, basil and garlic powder in a bowl.
In a medium saucepan, bring the water, oil and salt to a boil. Reduce the heat to a vigorous simmer and sprinkle in a small portion of the flour mixture while whisking vigorously to avoid lumps. Continue to incorporate the flour mixture in increments. Cook the mixture until it begins to pull away a bit from the sides of the saucepan. It will be very thick.
Transfer the mixture to the baking dish and spread evenly. Let cool a bit and then cover with foil or plastic wrap and refrigerate for several hours or until completely chilled and firm set.
Cut the panelle into any desired shape and fry until golden brown in hot cooking oil. They take a little time to brown, so be patient. Transfer to a plate lined with paper towels to blot excess oil. Serve warm.
Print Recipe
Sicilian Panelle
Votes: 22
Rating: 3.5
You:
Rate this recipe!
|
|
Votes: 22
Rating: 3.5
You:
Rate this recipe!
|
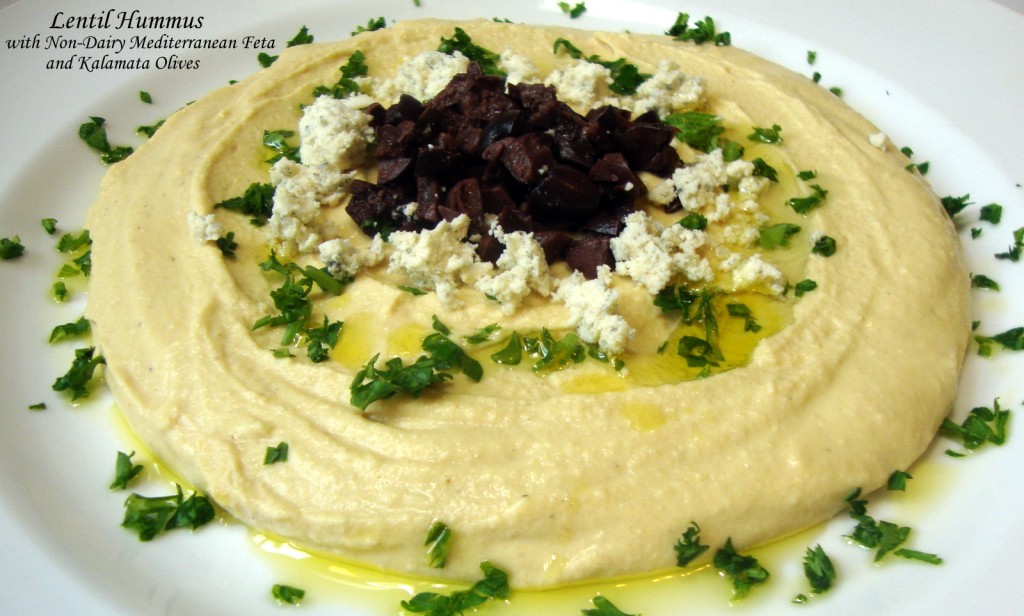 Hummus is a classic Middle Eastern dish and is excellent served as a dip or sandwich spread. This variation is made with cooked red or yellow lentils instead of the traditional chickpeas. It’s smooth, creamy and delicious! Sweating the garlic prior to blending mellows the garlic flavor. Serve with warm or toasted pita or other flatbread, and/or crunchy fresh vegetables. This recipe yields about 2 cups.
Ingredients
• 1 cup dry red or yellow lentils
• 1 T extra-virgin olive oil, plus additional for garnish
• 3 medium cloves garlic, chopped
• ¼ cup sesame tahini
• 1 T fresh lemon juice, or more to taste
• 1 tsp ground cumin
• ½ tsp ground coriander
• ½ tsp fine sea salt or kosher salt, or more to taste
• ¼ tsp ground white pepper
• water sufficient for processing
• 1 T chopped fresh parsley for garnish
• other garnish(es) of your choice*
*Other garnishes might include but are not limited to: Non-dairy feta (from the Non-Dairy Evolution Cookbook); sweet or smoked paprika; powdered sumac; roasted or sautéed minced garlic; chopped roasted red peppers; dairy-free pesto; toasted pine nuts; chopped cilantro or basil.
Preparation
Sort through the dry lentils and remove any foreign matter. Rinse the lentils thoroughly in a sieve, drain and add to a medium cooking pot. Add 4 cups water and 1 teaspoon sea salt or kosher salt and bring to a boil. Stir the lentils, partially cover the pot, reduce the heat to a simmer and cook for 20 minutes or until tender. Drain the cooked lentils thoroughly in the sieve.
While the cooked lentils are draining, add 1 tablespoon olive oil to a small skillet and place over medium-low to low heat. Sweat the garlic about 10 minutes to mellow and sweeten the flavor and remove the raw pungency. If you hear an audible “sizzle” from the oil, the heat is too high; turn it down slightly.
Place the drained lentils into a blender or food processor and add the sautéed garlic and remaining ingredients except for the parsley and other optional garnishes. Process until very smooth. Add water as needed to assist processing. The hummus should be creamy and smooth, not thick and pasty.
Taste and add salt or more lemon juice as desired (lemon juice plays a supporting role in flavor development but the hummus should not have an obvious lemon flavor). Transfer to a bowl, cover and refrigerate for a minimum of 30 minutes to thicken and blend the flavors before serving, or for up to 1 week. The hummus will thicken a little bit upon refrigeration; if it becomes too thick after chilling, simply incorporate a little water.
Drizzle with extra-virgin olive oil and garnish as desired before serving.
Print Recipe
Lentil Hummus
Votes: 1
Rating: 5
You:
Rate this recipe!
|
|
Votes: 1
Rating: 5
You:
Rate this recipe!
|
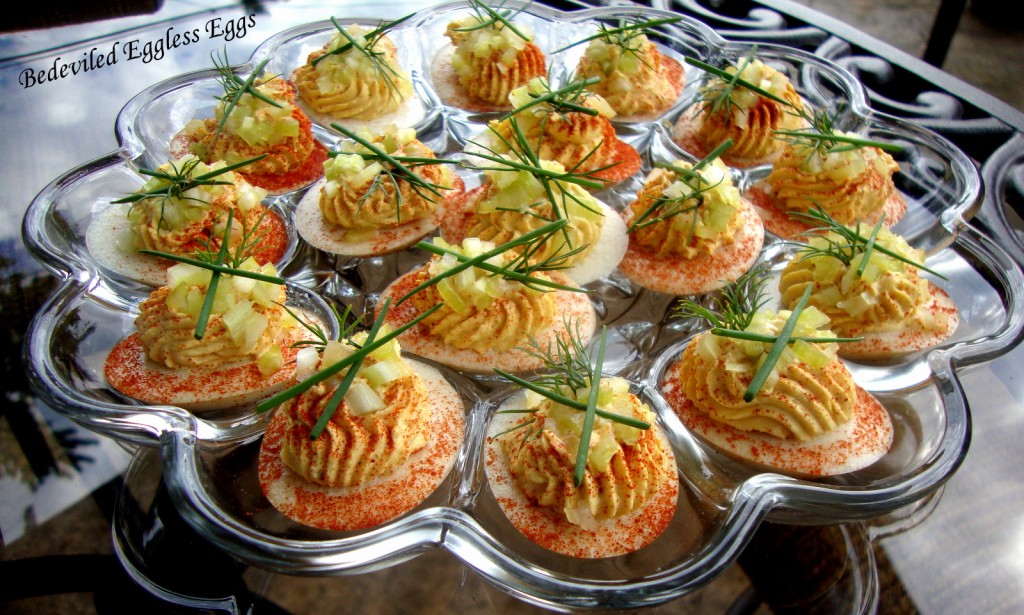 Bedeviled eggless eggs are remarkably similar to deviled eggs in appearance, taste and texture. They make the perfect bite-size finger food for BBQs, picnics and parties. Kala namak, or Himalayan black salt, is essential to impart that familiar egg-like taste to these savory bites.
A blender is required for preparing the “egg whites” and a food processor is recommended for the “yolk filling”. You will also need an 8” square baking pan and 1 block (about 14 oz. before pressing) extra-firm water-packed tofu (not silken tofu). If you have egg molds, or a heat-proof container that specifically holds deviled eggs, the “egg white” mixture can be poured directly into the molds to create perfect, halved hard-boiled egg shapes. This recipe yields 16 to 24 bedeviled eggless eggs or more depending upon the mold(s) used for the “egg whites”.
Ingredients for the “Egg Whites”
• ⅓ block (about 5 oz before pressing) extra-firm tofu (not silken tofu)
• ¾ tsp kala namak (Himalayan black salt)
• 2 cups water
• 2 and ¼ tsp agar powder
Ingredients for the “Yolk” Filling
• ⅔ block (about 9 oz before pressing) extra-firm tofu (not silken tofu)
• ¼ cup eggless mayonnaise
• 1 T nutritional yeast flakes
• 1 T dill pickle brine
• 2 tsp Dijon mustard or spicy golden mustard
• ½ tsp onion powder
• ¼ tsp kala namak* (Himalayan black salt), or more to taste
• ¼ tsp sweet paprika (for extra “bedeviling” add a pinch of cayenne pepper too)
• ¼ tsp ground turmeric
Garnishes
• sweet paprika
• optional: coarse ground black pepper, sliced black olives; fresh snipped chives or “spears”; capers; minced celery; minced onion; chopped cornichons; chopped dill or dill “fronds”
Preparation
Drain and press the tofu until it is not releasing any more liquid. Slice ⅓ of the tofu to use for the “egg whites”. The remaining ⅔ will be used for the “yolk” filling.
To prepare the “egg whites”, place the “egg white” ingredients into a blender and process until smooth. Pour the mixture into a saucepan and bring to a simmer over medium heat, stirring frequently to avoid scorching the tofu mixture. Avoid boiling as this will cause the soy protein to re-coagulate (a minimal degree of re-coagulation may occur as the mixture is brought to a simmer but will not affect the final appearance or texture). Pour the mixture into the 8” baking pan and set aside to cool. If you have egg molds, or a heat-proof container that specifically holds deviled eggs, pour the tofu mixture directly into the molds and set aside to cool. After cooling a bit, refrigerate until completely set, about 1 hour.
Next, crumble the ⅔ block of pressed tofu into the food processor and add the remaining “yolk” filling ingredients. Process the contents until completely smooth, stopping as necessary to scrape down the sides of the food processor. Alternately, the mixture can be mashed using a fork or a potato masher/ricer, but the mixture will not be as smooth. Taste the mixture and add additional kala namak (or sea salt) as desired.
Transfer the “yolk” mixture to a bowl or food storage container, cover and refrigerate until ready to use.
Now, run a table knife around the perimeter of the baking pan to loosen the “egg white” (or simply pop them out of the egg molds). Invert the baking pan onto a clean work surface. At this point, the “egg white” can be cut into rectangles or cut into rounds or ovals.
For rectangles, cut the “egg whites” into 6 even strips. Turn your cutting surface and make 4 even slices. This will create 24 rectangles. For rounds or ovals, use a 1 and ½-inch to 1 and ¾-inch cookie cutter or ring mold. Any “egg white” remnants can be finely diced and mixed with any of the leftover “yolk” filling for a quick eggless egg salad sandwich.
Spoon a generous teaspoonful of the “yolk” mixture onto the top of each “egg white”. Alternately, the mixture can be decoratively piped onto the “egg whites” using a pastry bag. If you don’t have a pastry bag, try placing the mixture into a zip-lock bag, seal and then snip off a tiny piece from the bottom corner of the bag with scissors. Squeeze the bag to pipe the mixture onto the “egg whites”.
Sprinkle with paprika and garnish with optional ingredients as desired. Cover gently with plastic wrap and chill thoroughly before serving.
Print Recipe
Bedeviled Eggless Eggs
Votes: 19
Rating: 4.53
You:
Rate this recipe!
|
|
Votes: 19
Rating: 4.53
You:
Rate this recipe!
|
 Important! This recipe should only be used if you wish to prepare solid “hard-cooked” eggless eggs. If you wish to prepare vegan deviled “eggs” or eggless “egg” salad, please see the appropriate recipe in this blog or in my Non-Dairy Evolution Cookbook, as these recipes are much less involved and easier to prepare.
This is my own recipe and technique for producing “hard-cooked” eggless eggs that are remarkably similar to their egg counterparts in appearance, flavor and texture. For this recipe, you will need 2 six-count egg molds which will yield one dozen “hard-cooked” eggless eggs. If you only have one mold set, any remaining “yolk” and “egg white” mixture” can be used for crumbled “hard-cooked” eggless egg (superb for topping cold salads) or for eggless egg salad sandwiches.
Please note: The “eggs” cannot be used for heated applications, such as “Scotch eggs”, because the agar will melt and the eggs will turn to mush. They must remain chilled or at room temperature for serving.
About the egg molds: The internet source I was recommending for the egg molds is no longer offering that product, so you will have to do some internet searching for the molds. Many of my readers have found luck locating them on Ebay.com (search for “Jell-O jiggler egg molds”).

Food Processor Ingredients for the “Egg Yolks”
• 5 oz pressed extra-firm block tofu (about one-half of a standard block; do not use silken tofu)
• 2 T refined coconut oil, melted
• 2 T nutritional yeast flakes
• ¼ tsp sodium alginate, guar gum or xanthan gum
Saucepan Ingredients for the “Egg Yolks”
• ½ cup water
• 1 and ½ tsp agar powder
• ½ tsp sweet paprika
• ½ tsp ground turmeric
• ¼ tsp kala namak (Himalayan black salt)
Blender Ingredients for the “Egg Whites”
• 5 oz pressed extra-firm block tofu (about one-half of a standard block; do not use silken tofu)
• 3 cups water
• ½ cup plain unsweetened non-dairy milk
• 4 tsp agar powder
• 1 and ¼ tsp kala namak (Himalayan black salt)
Additional Items Needed
• 2 six-count egg molds
• food processor
• blender
• small saucepan
• a melon baller or ½ T measuring spoon
• small food storage container that will hold about 2 cups
• 2 cup measuring cup with pouring lip
• wax paper or parchment paper
Preparing the “Yolks”
Set the “egg molds” aside. Be sure they are completely snapped together.
Place the food processor ingredients for the “yolks” into a food processor; process into a coarse paste.
Combine the saucepan ingredients for the “yolks” in the saucepan and heat until bubbly over medium heat. Swirl the contents occasionally as the mixture heats.
With the food processor running, pour the molten saucepan mixture into the food chute. Process the entire contents until smooth. Stop as needed to scrape down the sides with a flexible spatula.
Transfer the “yolk” mixture to the food storage container and chill uncovered for a minimum of 1 hour to firm.
Line a plate with wax or parchment paper. Using a melon baller, rounded measuring spoon or similar object, scoop some of the “yolk” mixture into a rough ball shape, about the size of a hardened egg yolk. Roll the mixture between your palms to round the ball and smooth the surface a bit. It doesn’t have to be totally smooth. Set it on the lined plate. Repeat the procedure until you have 12 “yolks”. Make sure the “yolks” are not touching each other on the plate or they will stick together when frozen. This procedure is a bit messy and some of the mixture will stick to your hands, so keep a moist towel nearby. Place the uncovered plate into the freezer for about 1 hour. Avoid freezing for more than 2 hours or ice crystals will form on the “yolks”.
Preparing the “Egg Whites”
When ready to proceed, add the blender ingredients for the “egg whites” to a blender and process until completely liquefied. Add half of the mixture to the saucepan and heat to a soft boil, stirring frequently to avoid scorching. Transfer the hot mixture to the measuring cup with the lip. The mixture may begin to curdle a bit in the measuring cup – this is normal and will not affect the finished flavor or texture. Pour the mixture into the molds, filling them no more than halfway. Let cool at room temperature for 10 minutes to help set the “white” mixture just a bit (this will help keep the yolk suspended, rather than sinking).
Carefully open the molds and place the frozen “yolks” in the center of each “white”. Close the molds and securely snap shut. Make sure they are completely snapped shut or the molten “white” mixture will leak out when topping off.
Pour the remaining “egg white” mixture into the saucepan and bring to a soft boil, stirring frequently. Transfer the mixture to the measuring cup and then fill each egg mold with the mixture to the top of the stems. The mixture may begin to curdle a bit in the measuring cup – this is normal and will not affect the finished flavor or texture. Let settle momentarily and then top off each mold with the mixture (the excess “whites” in the stems can be trimmed away later).
Transfer the molds to the refrigerator and chill for a few hours until completely set. Be careful handling the molds when transferring to the refrigerator so they do not pop open accidentally (for assurance, place the molds on a tray and then transfer to the refrigerator).
Finishing the “Hard-Boiled Eggs”
Open the molds and pop out the “eggs”. There will be a seam on the “eggs” where the molds joined together. Use a dry paper towel to gently rub the “egg” and remove the seam. Trim off the stem ends as needed with a paring knife. Chill the “eggs” in an airtight container until ready to use. The “eggs” should be consumed within 1 week. I’ve never frozen them for storage, so I cannot advise if this can be done successfully without damaging the texture.

Print Recipe
“Hard-Cooked” Eggless Eggs
Votes: 56
Rating: 3.88
You:
Rate this recipe!
|
|
Votes: 56
Rating: 3.88
You:
Rate this recipe!
|
 An appetizer favorite, fried mozzarella sticks can also be made with Mozzarella di Campana or di Tuscano (from The Non-Dairy Evolution Cookbook) for additional zesty Italian flavor.
Ingredients
• 1 block Mozzarella Fior di Latte (from the Non-Dairy Evolution Cookbook)
or Mozzarella di Tuscano or di Campana variations
• 1 cup plain unsweetened non-dairy milk
• ½ cup all-purpose flour or rice flour
• 1 T nutritional yeast flakes
• 1 cup plain fine dry breadcrumbs
• ½ cup panko-style bread crumbs
• 1 and ½ tsp fine sea salt or kosher salt
• 1 tsp onion powder
• 1 tsp garlic powder
• 1 tsp dried oregano
• 1 tsp dried basil
• ½ tsp coarse ground black pepper
• high-temp cooking oil, such as grapeseed, safflower, sunflower
• marinara sauce, for dipping
Preparation
Cut the mozzarella into sticks and keep chilled until ready to prepare the breading. Prepare the marinara sauce ahead of time so it can be reheated just before serving the fried mozzarella.
In one bowl, whisk the milk, flour and nutritional yeast together until smooth. Set aside.
In another bowl, combine the breadcrumbs and seasonings.
Dip a mozzarella stick into the milk/flour batter, shake off the excess and roll in the breadcrumbs until thoroughly coated. Handle them gently so as to not dislodge the breading. Place the stick on a plate and repeat with the remaining sticks. If the breading is not adhering completely, repeat dipping in the milk/flour mixture and then the breadcrumbs. It’s important to achieve complete coverage. Place the plate into the refrigerator uncovered for 30 minutes to allow the breading to dry a bit and thoroughly chill the mozzarella.
Add 1-inch of oil to a deep skillet or wok and place over medium-high heat. Place the marinara sauce over medium heat to warm while frying the mozzarella sticks.
When the oil begins to shimmer, gently lower a few of the sticks into the hot oil and fry until golden brown. Fry the sticks in batches; remove with a slotted spoon and place on a plate lined with paper towels to absorb any excess oil.
Serve immediately with the marinara sauce. If the sticks need to be reheated, place them in a hot oven for about 10 minutes; they also respond well to brief reheating in a microwave (they heat from within, which is very efficient for melting the cheese).
Print Recipe
Fried Mozzarella Sticks (Non-Dairy)
Votes: 13
Rating: 3.54
You:
Rate this recipe!
|
|
Votes: 13
Rating: 3.54
You:
Rate this recipe!
|