Important! This recipe should only be used if you wish to prepare solid “hard-cooked” eggless eggs. If you wish to prepare vegan deviled “eggs” or eggless “egg” salad, please see the appropriate recipe in this blog or in my Non-Dairy Evolution Cookbook, as these recipes are much less involved and easier to prepare.
This is my own recipe and technique for producing “hard-cooked” eggless eggs that are remarkably similar to their egg counterparts in appearance, flavor and texture. For this recipe, you will need 2 six-count egg molds which will yield one dozen “hard-cooked” eggless eggs. If you only have one mold set, any remaining “yolk” and “egg white” mixture” can be used for crumbled “hard-cooked” eggless egg (superb for topping cold salads) or for eggless egg salad sandwiches.
Please note: The “eggs” cannot be used for heated applications, such as “Scotch eggs”, because the agar will melt and the eggs will turn to mush. They must remain chilled or at room temperature for serving.
About the egg molds: The internet source I was recommending for the egg molds is no longer offering that product, so you will have to do some internet searching for the molds. Many of my readers have found luck locating them on Ebay.com (search for “Jell-O jiggler egg molds”).

Food Processor Ingredients for the “Egg Yolks”
• 5 oz pressed extra-firm block tofu (about one-half of a standard block; do not use silken tofu)
• 2 T refined coconut oil, melted
• 2 T nutritional yeast flakes
• ¼ tsp sodium alginate, guar gum or xanthan gum
Saucepan Ingredients for the “Egg Yolks”
• ½ cup water
• 1 and ½ tsp agar powder
• ½ tsp sweet paprika
• ½ tsp ground turmeric
• ¼ tsp kala namak (Himalayan black salt)
Blender Ingredients for the “Egg Whites”
• 5 oz pressed extra-firm block tofu (about one-half of a standard block; do not use silken tofu)
• 3 cups water
• ½ cup plain unsweetened non-dairy milk
• 4 tsp agar powder
• 1 and ¼ tsp kala namak (Himalayan black salt)
Additional Items Needed
• 2 six-count egg molds
• food processor
• blender
• small saucepan
• a melon baller or ½ T measuring spoon
• small food storage container that will hold about 2 cups
• 2 cup measuring cup with pouring lip
• wax paper or parchment paper
Preparing the “Yolks”
Set the “egg molds” aside. Be sure they are completely snapped together.
Place the food processor ingredients for the “yolks” into a food processor; process into a coarse paste.
Combine the saucepan ingredients for the “yolks” in the saucepan and heat until bubbly over medium heat. Swirl the contents occasionally as the mixture heats.
With the food processor running, pour the molten saucepan mixture into the food chute. Process the entire contents until smooth. Stop as needed to scrape down the sides with a flexible spatula.
Transfer the “yolk” mixture to the food storage container and chill uncovered for a minimum of 1 hour to firm.
Line a plate with wax or parchment paper. Using a melon baller, rounded measuring spoon or similar object, scoop some of the “yolk” mixture into a rough ball shape, about the size of a hardened egg yolk. Roll the mixture between your palms to round the ball and smooth the surface a bit. It doesn’t have to be totally smooth. Set it on the lined plate. Repeat the procedure until you have 12 “yolks”. Make sure the “yolks” are not touching each other on the plate or they will stick together when frozen. This procedure is a bit messy and some of the mixture will stick to your hands, so keep a moist towel nearby. Place the uncovered plate into the freezer for about 1 hour. Avoid freezing for more than 2 hours or ice crystals will form on the “yolks”.
Preparing the “Egg Whites”
When ready to proceed, add the blender ingredients for the “egg whites” to a blender and process until completely liquefied. Add half of the mixture to the saucepan and heat to a soft boil, stirring frequently to avoid scorching. Transfer the hot mixture to the measuring cup with the lip. The mixture may begin to curdle a bit in the measuring cup – this is normal and will not affect the finished flavor or texture. Pour the mixture into the molds, filling them no more than halfway. Let cool at room temperature for 10 minutes to help set the “white” mixture just a bit (this will help keep the yolk suspended, rather than sinking).
Carefully open the molds and place the frozen “yolks” in the center of each “white”. Close the molds and securely snap shut. Make sure they are completely snapped shut or the molten “white” mixture will leak out when topping off.
Pour the remaining “egg white” mixture into the saucepan and bring to a soft boil, stirring frequently. Transfer the mixture to the measuring cup and then fill each egg mold with the mixture to the top of the stems. The mixture may begin to curdle a bit in the measuring cup – this is normal and will not affect the finished flavor or texture. Let settle momentarily and then top off each mold with the mixture (the excess “whites” in the stems can be trimmed away later).
Transfer the molds to the refrigerator and chill for a few hours until completely set. Be careful handling the molds when transferring to the refrigerator so they do not pop open accidentally (for assurance, place the molds on a tray and then transfer to the refrigerator).
Finishing the “Hard-Boiled Eggs”
Open the molds and pop out the “eggs”. There will be a seam on the “eggs” where the molds joined together. Use a dry paper towel to gently rub the “egg” and remove the seam. Trim off the stem ends as needed with a paring knife. Chill the “eggs” in an airtight container until ready to use. The “eggs” should be consumed within 1 week. I’ve never frozen them for storage, so I cannot advise if this can be done successfully without damaging the texture.

Print Recipe
“Hard-Cooked” Eggless Eggs
Votes: 56
Rating: 3.88
You:
Rate this recipe!
|
|
Votes: 56
Rating: 3.88
You:
Rate this recipe!
|
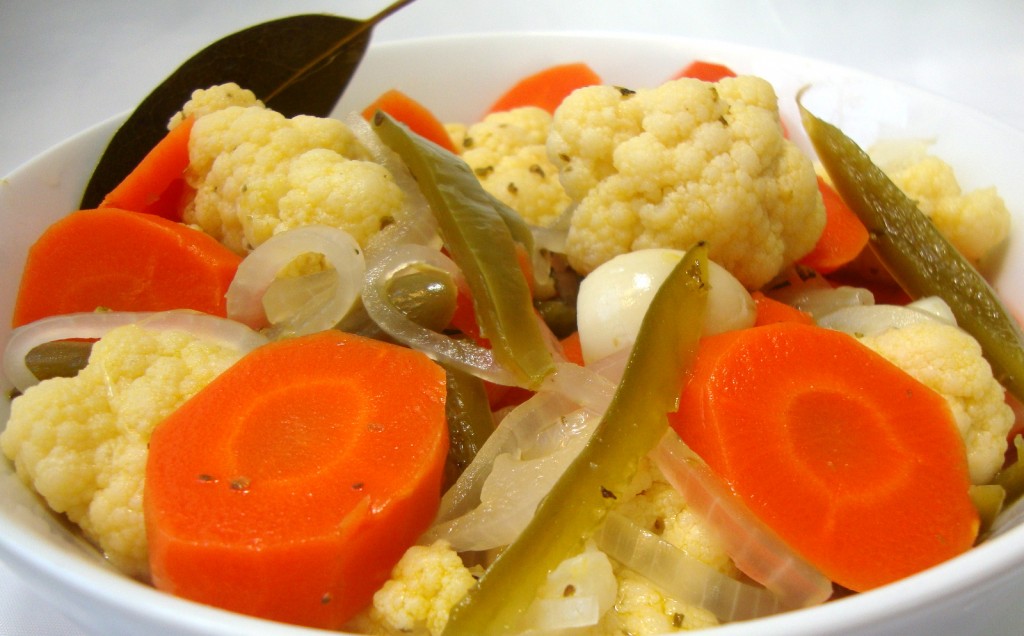 “Escabeche” is the Spanish word for “pickle”. This simple but zesty combination of crunchy pickled vegetables is a favorite for serving with Mexican cuisine.
Ingredients
• 2 T olive oil
• 1 large yellow or white onion, peeled and thinly sliced
• 3 large carrots, peeled and sliced
• florets from 1 small cauliflower
• 12 whole cloves garlic
• 3 large jalapeno or serrano chilies, seeded, membrane removed and sliced lengthwise into slivers
• 3 T coarse sea salt or kosher salt
• 2 and ½ cups water
• 1 cup champagne vinegar, white wine vinegar or distilled white vinegar
• 1 T organic sugar
• 2 bay leaves
• ½ tsp dried oregano
• ½ tsp dried marjoram
• ½ tsp dried thyme
Technique
Add the olive oil to a large cooking pot and place over medium-low heat. Add the vegetables and salt and sweat the mixture for about 10 minutes until softened. Keep the heat on the low side to avoid browning the vegetables.
Add the water, vinegar, sugar and herbs and bring to a rapid boil. Cover the pot and remove from the heat to cool. When cooled, divide the mixture between 2 one-quart jars (be sure to include a bay leaf into each jar), seal and refrigerate for a minimum of 3 days before serving (the longer the better). The refrigerated escabeche will last for a few months stored in this manner.
To seal the jars and preserve the escabeche for pantry storage, removing the pot from the heat. Carefully divide the hot mixture between 2 one-quart mason jars (be sure to include a bay leaf in each jar). Put the lids in place and tighten the lid rings. Invert the jars for 10 minutes. After 10 minutes, upright the jars and slightly loosen the lid rings. Let the jars rest and cool until the lids “pop” and seal shut. Retighten the lid rings and store the jars in your pantry until ready to use.
Print Recipe
Escabeche (Mexican Spicy Pickled Vegetables)
Votes: 236
Rating: 3.91
You:
Rate this recipe!
|
|
Votes: 236
Rating: 3.91
You:
Rate this recipe!
|
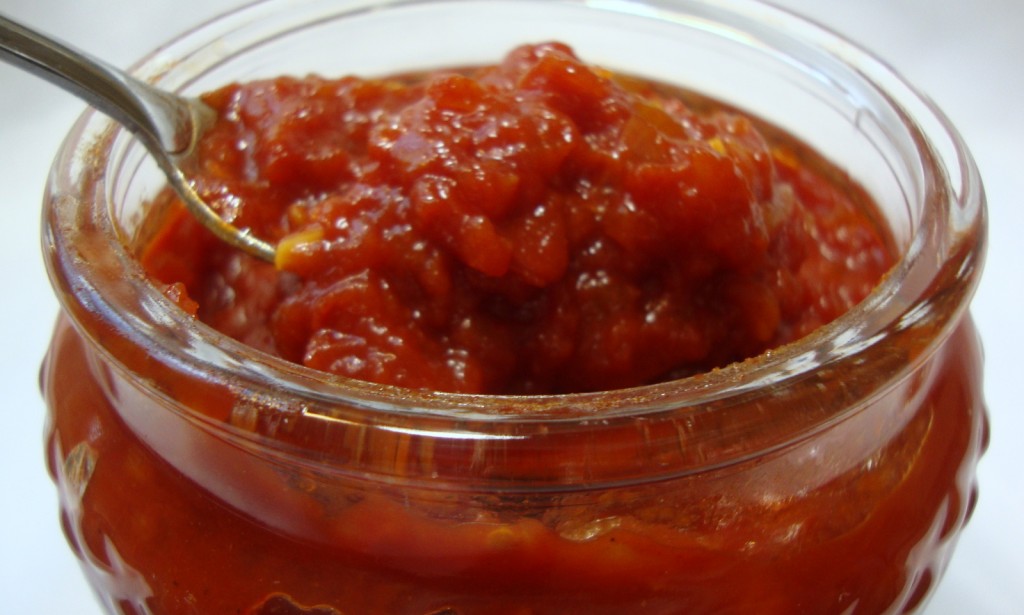 Although many people consider tomatoes to be a vegetable, they’re actually a fruit; so why not make them into jam? Actually, tomato jam is more like a relish than a true jam. My partner Chef Mike and I created this blend one Sunday afternoon and we were thrilled with the lovely balance of sweet, tangy and smoky flavors. This jam is wonderful when used as an alternative to ketchup on veggie burgers and hot dogs. It’s also excellent when served with cheese, such as non-dairy chèvre, on crostini or crusty bread. This recipe yields about 2 cups.
Ingredients
• 1 can (28 oz) whole peeled plum tomatoes or 1 and ½ lb fresh plum tomatoes
• 1 T olive oil
• ½ cup diced sweet yellow onion
• 3 cloves garlic, minced
• ½ cup organic sugar
• ¼ cup sherry vinegar
• 2 T tomato paste
• 2 tsp smoked paprika
• 1 tsp fine sea salt or kosher salt
• ½ tsp ground white pepper
Technique
Drain the excess liquid from the can of tomatoes and place the tomatoes into a food processor; do not process yet. If using fresh tomatoes, bring a large volume of water to a boil. Core the tomatoes and place them into the boiling water for 1 minute. Immediately plunge them into an ice water bath. Once cooled, the skins should slip off easily. Place the tomatoes into the food processor; do not process yet.
In a medium saucepan, sweat the onion and garlic in the olive oil over medium-low heat, stirring occasionally. The goal is to soften and draw out the flavor of the onion and garlic without browning. When the onion becomes translucent, transfer the mixture to the food processor with the tomatoes and pulse a few times into a “salsa-like” consistency.
Transfer the tomato mixture back to the saucepan and stir in the remaining ingredients. Bring the mixture to a boil, reduce the heat to a gentle simmer and cook uncovered for 1 hour and 15 minutes, stirring occasionally. Let the jam cool and transfer to a sealable container. Refrigerate until well-chilled before serving. Keep in mind that this is a fresh jam, not a preserved jam, but the acidity and sugar will keep it fresh in the refrigerator for a few weeks.
Print Recipe
Sweet and Smoky Tomato Jam
Votes: 7
Rating: 4.43
You:
Rate this recipe!
|
|
Votes: 7
Rating: 4.43
You:
Rate this recipe!
|
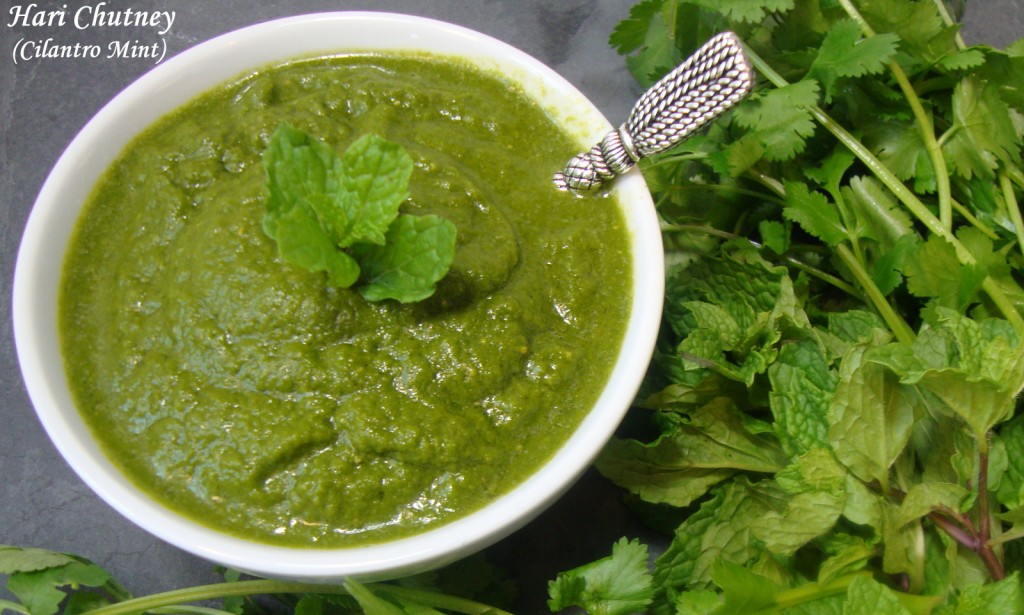 This bright green, tangy and refreshing Indian chutney is my absolute favorite condiment. Enjoy it with all Indian cuisine and as a spread or dip for samosa (deep-fried or baked pastry with savory filling), pakoras (Indian vegetable fritters) naan, papadum, roti and any and all other flatbreads and crackers. If you have a timid palate, start with ½ of the green chile and increase according to taste. Try mixing the chutney with plain non-dairy yogurt for a uniquely different salad dressing. It also adds wonderful flavor to non-dairy Crème Fraîche, sour cream and even eggless mayonnaise. The chutney will last about 1 week stored in the refrigerator; simply freeze any unused portion (try freezing in silicone molds or ice cube trays for easy use). This recipe yields about 1 and ¾ cup.
Ingredients
• 2 large bunches of cilantro (excess stems at bottom removed)
• 1 large handful of mint leaves (stems removed)
• 1 medium yellow onion, peeled and chopped
• 1 small green chile, seeded and chopped (or a large chile if you can take the heat)
• 1 clove garlic, peeled
• 2 T fresh lemon juice
• 1 tsp cumin seeds
• ¾ tsp sea salt or kosher salt, or more to taste
Technique
Process all ingredients in a blender until smooth. Season with additional salt to taste as desired. Store in an airtight container in the refrigerator.
Print Recipe
Hari Chutney (Cilantro Mint)
Votes: 0
Rating: 0
You:
Rate this recipe!
|
|
Votes: 0
Rating: 0
You:
Rate this recipe!
|
Tofu-based sour cream has never appealed to me because I cannot tolerate the chalky undertaste; and uncultured cashew-based sour cream doesn’t work for me either because the natural sweetness of the cashews yields a product that is much too sweet for my liking (although it works in dessert applications). Cultured cashew-based sour cream, on the other hand, has a very accurate dairy sour cream flavor because the lacto-bacterial culture converts the natural sugar in the cashews into lactic acid, thus providing the authentic tanginess and eliminating the excessively sweet taste. However, preparing rejuvelac and culturing the cream takes several days and sometimes a quick alternative is appreciated.
It took some experimentation to achieve a texture and flavor that satisfied my taste, but I think this quick version makes an excellent alternative to its cultured counterpart. While this recipe still uses cashews to add body to the cream, the ratio of cashews is significantly reduced. Please note that there is no alternative to using soymilk in this recipe. Thickening is dependent upon the curdling action of soymilk when lactic acid is introduced. Other plant milks will not react to the acid in the same manner.
Vegan lactic acid powder can be purchased online from ModernistPantry.com. Citric acid powder can be used as an alternative to lactic acid powder but will not provide the same lactic dairy flavor. I don’t recommend lemon juice as an alternative acid for this recipe, since the water content in lemon juice will thin the texture too much. This recipe yields about 1 and ¾ cup sour cream.
Ingredients
• ¼ cup refined coconut oil
• ½ cup (2.5 oz.) whole raw cashews (pre-soaking is not necessary)
• 1 and ¼ cup organic plain unsweetened soymilk (sorry, no substitutes)
• ¼ tsp fine sea salt or kosher salt
• 1 and ½ tsp lactic acid
Preparation
Remove the lid from the coconut oil and place the jar or bottle into a microwave. Heat until melted (about 30 seconds to 1 minute depending upon the solidity of the coconut oil); avoid overheating the oil. Alternately, place the jar or bottle into a container filled with near boiling water and let stand until the oil melts. Measure the coconut oil and set aside.
Measure the lactic acid and set aside in a small dish.
Add the cashews, soymilk and salt to a high-powered blender, cover and process for 2 full minutes.
Remove the lid plug and with the blender running on high speed, add the coconut oil.
Reduce the speed to low and add the lactic acid powder. The cream will thicken instantly – turn the blender off. Do not continue to process once thickened.
Transfer the sour cream to an airtight container, seal and refrigerate for a minimum of 6 hours until well-chilled and further thickened. Consume within 10 days of preparation.
Print Recipe
Quick Non-Dairy Sour Cream
Votes: 37
Rating: 3.84
You:
Rate this recipe!
|
|
Votes: 37
Rating: 3.84
You:
Rate this recipe!
|
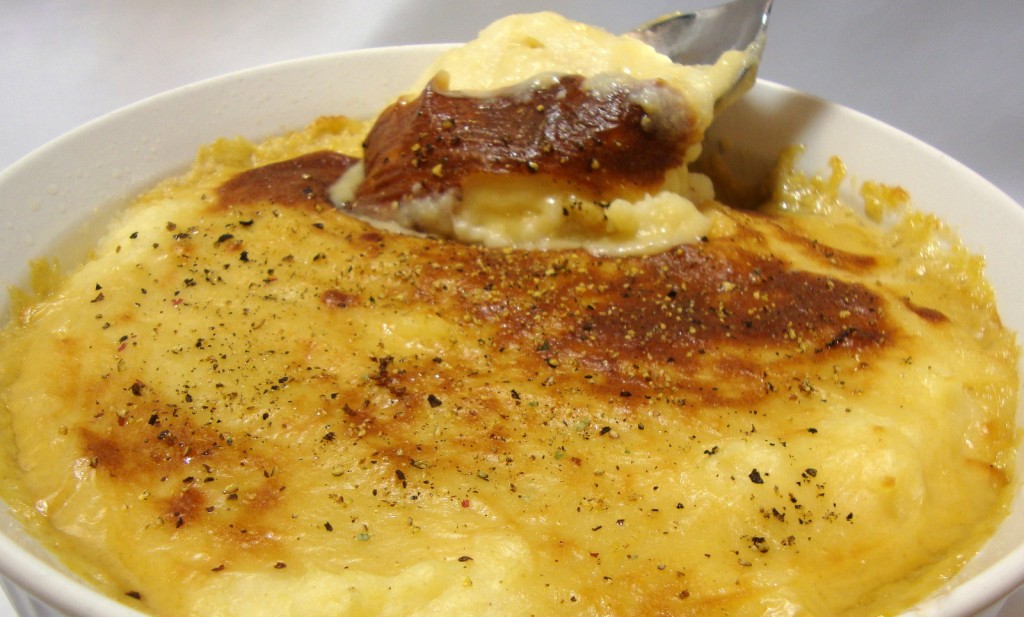 A fluffy and creamy gratin of whipped potatoes and parsnips blended with non-dairy butter, tangy non-dairy Crème Fraîche and gooey, melted non-dairy Jarlsberg cheese.
Ingredients:
• 1 cup Quick Crème Fraîche (from The Non-Dairy Evolution Cookbook)
– or 1 cup non-dairy milk of your choice
• 6 medium russet potatoes
• 4 medium parsnips
• 1 cup Jarlsberg Melt (recipe following)
• ¼ cup non-dairy butter or margarine
• ½ tsp fine sea salt or kosher salt
• ¼ tsp ground white pepper
• ⅛ tsp ground nutmeg
Technique:
If using the Crème Fraîche, prepare according to the cookbook instructions and refrigerate until ready to use. Non-dairy milk can be used instead, but the flavor and richness of the gratin will be altered somewhat.
Peel and cut the potatoes into large chunks. Place the potatoes immediately into a large cooking pot with plenty of water to cover. This will prevent oxidation of the potatoes (turning brown) while the parsnips are peeled and sliced.
Peel and slice the parsnips. Add them to the pot with 1 tablespoon of salt. Bring the water to a boil and cook until the vegetables are fork tender, about 15 minutes. Avoid overcooking.
While the water is coming to a boil and the vegetables are cooking, prepare the Jarlsberg Melt and set aside to cool.
Preheat the oven to 350°F. “Butter” a large baking or casserole dish and set aside.
When the vegetables are done cooking, drain them thoroughly in a colander for a few minutes and then transfer to a large mixing bowl. Add the butter, salt, white pepper and nutmeg and mash thoroughly using a potato ricer or masher.
Add the Crème Fraîche or non-dairy milk in increments and whip the mashed vegetables with an electric rotary mixer (if you have one). Otherwise continue to mash by hand until the mixture is smooth and fluffy.
Note: Never use a blender or food processor to mash potatoes as this will damage the cell structure of the potatoes and cause them to fall flat or become gooey. When potatoes are boiled, their starch granules swell. If those granules are broken too vigorously, the cells release large quantities of starch, resulting in potatoes with a pasty consistency.
Transfer the mixture to the baking dish and top with the Jarlsberg Melt. Bake uncovered for 30 minutes and then place under the broiler for 1 to 2 minutes to achieve a bubbly and browned cheese crust on top. Serve hot.
Jarlsberg Melt
(from The Non-Dairy Evolution Cookbook)
Jarlsberg shares flavor similarities with Swiss cheese and can best be described as mild, buttery and nutty with a hint of sweetness. Do not omit the ground coriander, even though only a small amount is needed, as it is essential to the flavor of this melt. This recipe yields about 1 cup of melted cheese.
Ingredients:
• ¾ cup pure soymilk
• ¼ cup mild vegetable oil
• 3 T tapioca flour
• 1 T nutritional yeast flakes
• 1 T dry sherry or dry white wine*
• 2 tsp mellow white miso paste
• ½ T (1 and ½ tsp) sesame tahini
• ¼ tsp fine sea salt or kosher salt
• ¼ tsp guar gum, sodium alginate or xanthan gum
• ⅛ tsp ground coriander
*The sherry or wine can be omitted for health or ethical reasons, but this will alter the flavor profile.
Technique:
In a small saucepan, vigorously whisk together the ingredients until smooth. Cook the mixture over medium-low heat, stirring slowly and continually with a flexible spatula. As the mixture thickens and curdles (forms lumps), begin stirring vigorously until the curds disappear and the cheese becomes very thick, smooth and glossy. Set aside until ready to use in the recipe.
Print Recipe
Whipped Potato and Parsnip Gratin featuring Jarlsberg Melt
Votes: 2
Rating: 4.5
You:
Rate this recipe!
|
|
Votes: 2
Rating: 4.5
You:
Rate this recipe!
|