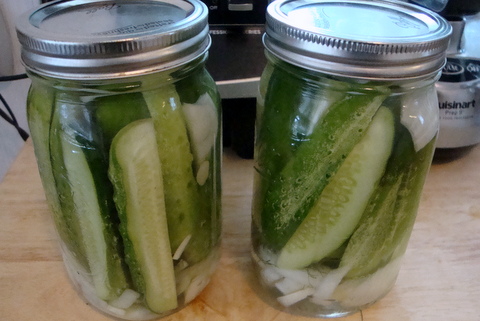
These easy-to-make pickles are fresh, crisp, tangy and nicely seasoned. The amount of brine is sufficient for preparing 2 quarts of pickles.
Ingredients:
• cucumbers, any variety, but pickling cucumbers are best
• 1 large onion, thinly sliced
• 3 cups filtered water
• ½ cup champagne vinegar or white vinegar
• 3 T sea salt or kosher salt
• 1 T organic sugar
• 2 T minced garlic (6 cloves)
• 2 T fresh chopped dill
• 1 tsp whole coriander seeds (optional)
• 1 tsp whole peppercorns or ½ tsp red pepper flakes (optional)
• 2 bay leaves
Technique:
In a bowl or large measuring cup, dissolve the salt and sugar in the vinegar and water to create the brine. Add the onion, garlic, bay leaves, dill and optional coriander seeds and pepper to a large container with a lid, or divide among 2 mason jars.
For smaller cucumbers, such as pickling cucumbers, leave unpeeled and slice in half or quarter lengthwise. For larger salad cucumbers which have tougher skins, use a vegetable peeler to cut strips of peel away, leaving some of the peel intact. This gives the cucumbers a nice variegated appearance; then cut into ¼ to ½-inch crosswise slices.
Stand the spears upright or layer the slices in the 2 jars. If using a large container, lay the spears on their side or layer the slices.
Pour the brine over the cucumbers, submerging them completely. Cover tightly. Refrigerate for a minimum of 72 hours, but the longer they “pickle”, the better. Enjoy!
Print Recipe
Refrigerator Pickles
Votes: 0
Rating: 0
You:
Rate this recipe!
|
|
Votes: 0
Rating: 0
You:
Rate this recipe!
|
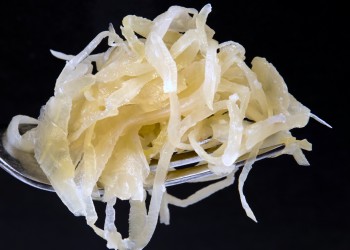
Sauerkraut is German for “sour cabbage,” but is originally a Chinese invention made with rice wine. Sauerkraut is made from finely cut cabbage that has been fermented by various lactic acid bacteria which propagate naturally during the fermentation process. It has a long shelf-life and a distinctively sour flavor, both of which result from the lactic acid that forms when the bacteria ferment the sugars in the cabbage.
Every chef has their own recipe for preparing sauerkraut and this is my personal formula and technique that works for me every time – with no undesirable mold blooms to skim from the surface of the brine during fermentation. Sauerkraut takes roughly 5 to 6 weeks from start to finish, so plan ahead and be patient – the results are worth waiting for.
Ingredients:
• 2 large heads green or red cabbage
• 3 T sea salt, kosher salt or pickling salt
• 3 cups filtered or spring water
• 1 T dried juniper berries (optional)
• 2 tsp caraway seeds (optional)
You will also need:
• 1 gallon wide-mouthed clear glass jar
• cheesecloth
• 2 one-quart zip-lock bags
• plastic wrap
Technique:
Before beginning, make sure the jar has been washed thoroughly with hot, soapy water and rinsed well; or run through the heated cycle in a dishwasher. Wash your hands thoroughly.
In a small saucepan, add 3 cups spring or filtered water and 1 teaspoon of the salt. Bring to a brief boil and remove from the heat to cool until lukewarm.
Remove any loose and damaged leaves from the heads of cabbage and either discard the leaves, save for preparing stock or compost. Split the heads of cabbage lengthwise (from the crown to the core). Cut a “V” shape to remove the tough core from each half.
Place a half head, cut side down, on a clean work surface and using a very sharp knife, begin to slice or “shave” the cabbage as thinly as possible to create very thin, long ribbons. Take your time slicing the cabbage, as very fine shreds will yield the best texture in the finished sauerkraut (personally, I use only the long, thin ribbons for the sauerkraut and save any pieces that are too large or too small for vegetable stock).
Place the shreds into the jar and sprinkle in 2 teaspoons of the salt. Repeat shredding the second half and place in the jar. Sprinkle again with 2 teaspoons salt. Using a potato masher or similar object, pack down the cabbage as firmly as possible. The salt will help draw out the juice from the cabbage to create the brine. If using the juniper berries and/or caraway seeds, sprinkle half over the cabbage.
Repeat with the second head of cabbage, adding 2 teaspoons of salt for each shredded half added to the jar. Pack down the cabbage again. If using the juniper berries and/or caraway seeds, sprinkle the remaining portion over the cabbage.
Fold a double layer of cheesecloth in half and cut to fit into the jar with some excess for tucking. Place on top of the cabbage shreds and using a dull table knife, tuck the cheesecloth snugly around the inner circumference of the jar. This will hold the shreds in place and keep them from floating upwards in the brine. Pour the cooled salted water over the cheesecloth.
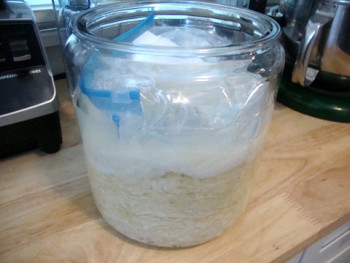
Fill a zip-lock bag about ⅔-full of water and seal. Tuck the bag into the second zip-lock bag and seal. The second bag will ensure that no leaks of water occur from the water-filled bag.
Place the water-filled bag into the jar on top of the cheesecloth. The weight of the bag will keep the mass of cabbage completely submerged in the brine during fermentation. If the cabbage is submerged completely, no undesirable mold blooms will occur. Seal the top of the jar with plastic wrap to prevent evaporation of the brine.
Place the jar in a cool place (a basement or cool pantry being ideal). A room temperature of 68 to 72 degrees is best for fermenting cabbage. Formation of gas bubbles after a few days indicates fermentation is taking place. Mark your calendar for 5 to 6 weeks.
Once a week, check the jar. The formation of gas bubbles will sometimes cause the packed shreds to rise in the jar, which can potentially expose the surface to air, thus encouraging undesirable mold blooms. Simply remove the plastic film and re-tuck and push the cheesecloth down around the inner circumference with the edge of a spoon. There’s no need to remove the bag of water; simply work around it (but be careful not to puncture the bag!). Re-seal the top of the jar with plastic wrap.
When fermentation is complete, pack individual mason jars with the sauerkraut and add enough brine to keep the shreds covered with the liquid, while leaving ½-inch of headspace in the jar. Fully fermented sauerkraut can be kept tightly covered in the refrigerator for a few months. The sauerkraut can be eaten raw, which promotes a healthy intestinal flora; or it can be cooked and used in your favorite recipe.
Print Recipe
Raw Sauerkraut
Votes: 0
Rating: 0
You:
Rate this recipe!
|
|
Votes: 0
Rating: 0
You:
Rate this recipe!
|
For purists who prefer to make their own recipe components, I’ve developed what is to my knowledge the first and only browning liquid made with organic sugar. Browning liquid is useful for adding a rich brown color to gravies, soups, stews, seitan and TVP. This browning liquid has no added caramel color, nor does it have the sweet undertaste of commercial browning liquids.
For soups, gravies and stews use 1 teaspoon per 2 cups liquid. For seitan and TVP, use the amount specified in the recipe. This recipe yields about ⅓ cup browning liquid.
Warning: This recipe produces copious amounts of smoke. Do not attempt unless you have an overhead exhaust fan for your stove that vents outside!
Ingredients:
• ¼ cup very hot water
• 2 T tamari, soy sauce or Bragg Liquid Aminos™
• 1 T dark balsamic vinegar
• ½ cup organic sugar
Technique:
In a small measuring cup, mix the very hot water, tamari and vinegar; set aside.
In a small saucepan, place the dry sugar over medium-low heat. The goal is to melt the dry sugar and bring it to a darkly caramelized stage (essentially burnt). Swirl or gently shake the saucepan back and forth occasionally as the sugar begins to melt but do not stir. Melting will take several minutes. Be sure to run an overhead stove exhaust fan as the sugar will produce smoke as it begins to burn. As the sugar continues to melt and darken, it will begin to rise in the saucepan. At this point, begin stirring gently with a wire whisk. When the sugar reaches a very dark brown color, reduce the heat to low.
Now, while whisking vigorously, add the broth mixture a little at a time to the melted sugar. The mixture will foam and sizzle, so don’t be alarmed. Very hot steam will also be released, so try to keep your hands back as you stir with the whisk to avoid steam burns. Continue to stir until the mixture is smooth and then remove the saucepan from the heat to cool. Once cooled, the browning liquid will have a syrupy consistency.
The concentrated liquid will have a rather bitter, burnt flavor; however, when used in small amounts as recommended, it will add a beautiful brown color and enhance the flavor of your favorite recipes. Store the mixture in an airtight jar in your pantry; refrigeration is not necessary. Replace the mixture after 4 months.
Print Recipe
Chef Skye’s Browning Liquid
Votes: 10
Rating: 3.3
You:
Rate this recipe!
|
|
Votes: 10
Rating: 3.3
You:
Rate this recipe!
|
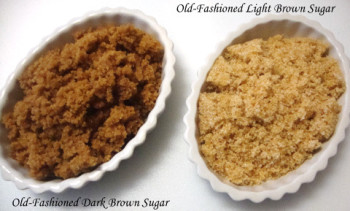
Homemade organic dark brown and light brown sugar are both very easy to make and they have a warmer color and much richer flavor compared to their commercially processed counterparts.
Ingredients:
• 1 cup organic cane sugar
• ¼ cup organic unsulfured molasses (for dark brown sugar)
or 1 T organic unsulfured molasses (for light brown sugar)
Technique:
Place the organic sugar in a food processor with a standard chopping blade. Begin processing and drizzle the molasses into the food processor through the food chute. Continue processing until evenly combined. Store the brown sugar in an airtight container at room temperature.
Print Recipe
Old-Fashioned Brown Sugar (Organic)
Votes: 0
Rating: 0
You:
Rate this recipe!
|
|
Votes: 0
Rating: 0
You:
Rate this recipe!
|
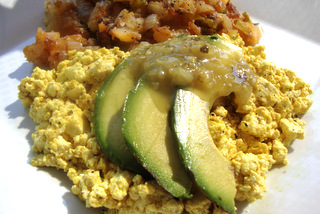
When preparing tofu scrambles, achieving the ideal balance of color and flavor can often be tricky. This blend will alleviate the guesswork for you; and if you prepare tofu scrambles frequently, then this seasoning blend will be a timesaver in your morning breakfast routine. This recipe yields ¾ cup of seasoning powder which will season about 16 blocks of tofu.
For each 14 oz. block of water-packed tofu, use 2 and ¼ teaspoons seasoning; or use the recipe for the basic tofu scramble (recipe follows).
Ingredients:
• 1 cup nutritional yeast flakes or ½ cup nutritional yeast powder
• 2 T onion powder
• 2 T kala namak (Himalayan black salt)
• 2 tsp paprika
• 2 tsp turmeric
Technique:
Place the ingredients in a DRY food processor or blender and process until a fine powder is achieved. Store the seasoning blend in an airtight container in your pantry until ready to use. Use the powder within 6 months.
For the basic scramble, you will need:
• 1 block (14 oz.) soft to firm water-packed tofu*
(silken tofu is not recommended for this recipe)
• 2 and ¼ tsp Tofu Scramble Seasoning Blend (see preceding recipe)
• 2 T Better Butter (from my cookbooks) or commercial vegan margarine
• coarse ground black pepper to taste
* I personally recommend soft to medium water-packed tofu for the best scramble texture.
Drain and press the tofu until it is not releasing any more liquid.
Crumble the tofu into a mixing bowl, sprinkle in the seasoning and toss thoroughly to blend. Avoid mashing the tofu.
Melt the butter or margarine in a skillet over medium heat. Do not let the butter brown. Add the seasoned tofu and “scramble” (push and fold the mixture with a spatula) until the tofu is heated through and resembles scrambled eggs. Season the scramble with pepper to taste (and add additional salt as desired). Serve immediately.
Print Recipe
Tofu Scramble Seasoning Blend
Votes: 25
Rating: 3.68
You:
Rate this recipe!
|
|
Votes: 25
Rating: 3.68
You:
Rate this recipe!
|
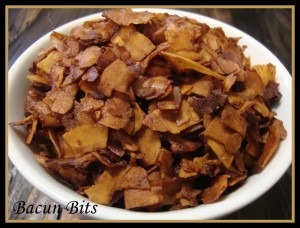
This recipe yields 1 cup of deliciously sweet, salty and smoky vegan bacon bits, which are ideal for topping salads or eggless egg recipes, such as omelettes, scrambles or vegan deviled “eggs”. However, these crispy bits are not recommended for prolonged cooking in moist dishes such as casseroles or quiches, as the coconut will rehydrate and produce an undesirable texture.
Ingredients:
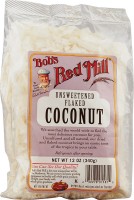
• 1 cup dried unsweetened coconut flakes (I recommend Bob’s Red Mill™ brand)
Seasoning ingredients:
• 2 T tamari, soy sauce or Bragg Liquid Aminos™
• 1 T dark brown sugar or real maple syrup
• 2 tsp liquid smoke
• 1 tsp vegan Worcestershire sauce (preferably from my recipe which can be found in The Gentle Chef Cookbook)
Technique:
In a bowl, whisk together the seasoning ingredients until the sugar is dissolved. Add the coconut flakes and toss well to evenly distribute the seasoning. Cover and refrigerate for a minimum of several hours, and better overnight, to rehydrate the coconut flakes and absorb the flavors.
Preheat the oven to 350°F.
Line a baking sheet with parchment paper and distribute the seasoned coconut flakes on the parchment paper in a single layer. For a peppery bacun flavor, season with fine ground black pepper. Place the baking sheet in the oven on a middle rack and set a timer for 5 minutes.
Remove from the oven and stir the flakes, again redistributing them in a single layer. This process will need to be repeated every 5 minutes for a total of about 15 minutes for slightly chewy bacun bits, or 20 minutes for crispy bacun bits.
Remove from the oven and let cool. Store in a zip-lock bag or a suitable covered container in the refrigerator until ready to use
Votes: 1
Rating: 5
You:
Rate this recipe!
|
|
Votes: 1
Rating: 5
You:
Rate this recipe!
|