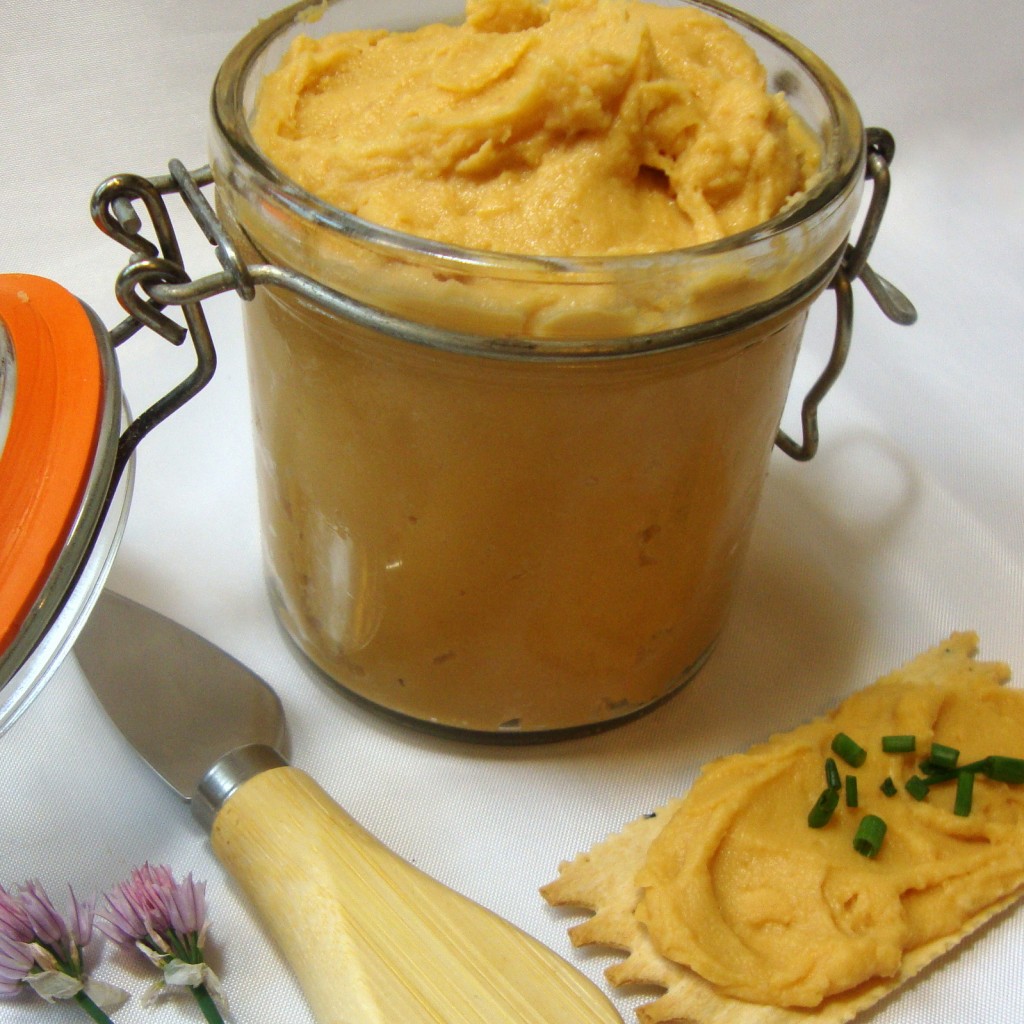
 Crock Beer Cheese is a spreadable sharp non-dairy cheddar enhanced with the flavor of beer. The beer is first reduced to eliminate the alcohol and a good portion of the water thus concentrating its flavor (the beer flavor is not a primary note in the cheese but rather contributes to the overall flavor profile). To spice things up, ground cayenne pepper can be added before cooking the cheese. For a robust cheese, prepared horseradish can be mixed into the cheese after it has set.
Crock Beer Cheese is superb for spreading on crackers, hard or soft pretzels or chunks of crusty bread. It can be melted on sandwiches or used in any application where spreadable sharp cheddar might be used.
Note: For this cheese, you will need a working understanding for preparing the Block Cheeses in the Non-Dairy Evolution Cookbook (see the main page of the TheGentleChef.com website for information on where to purchase the book). A cheese form is not required since the cheese will be stored in a crock or other suitable container. Any heat-proof container that will hold a minimum of 2 cups liquid will suffice for chilling and setting the cheese.
Ingredients
• 1 bottle (12 oz) beer of your choice, alcoholic or non-alcoholic
(please note that dark beers will darken the cheese)
• 1 T raw apple cider vinegar
• ½ tsp vegan lactic acid powder (available from ModernistPantry.com) or 2 tsp fresh lemon juice
• ½ cup refined coconut oil
• 1 cup organic plain unsweetened soymilk (no additives) or homemade almond milk
• ¼ cup tapioca flour
• ¼ cup nutritional yeast flakes
• 2 T mellow white miso paste
• 1 T tomato paste
• 2 tsp kappa carrageenan (available from ModernistPantry.com)
• 1 tsp fine sea salt or kosher salt
• 1 tsp dry ground mustard
• ½ tsp onion powder
• ½ tsp garlic powder
• optional: ¼ tsp ground cayenne pepper, or more to taste
• optional: 1 T prepared horseradish (not creamed) for stirring into the cheese after cooking and chilling
Technique:
First, gather all ingredients. Combine the vinegar with the lactic acid powder or lemon juice in a small dish and set aside near your cooking area. The acid mixture will be added to the cheese mixture after cooking.
Next, melt the coconut oil. Measure ½ cup and set aside.
In a medium saucepan, bring the beer to a simmer. Watch carefully while heating, as the beer will foam excessively and possibly boil over if brought to a vigorous boil. Skim and discard any excess foam. Simmer until reduced, about 15 minutes. Let the mixture cool until warm. Measure ⅓ cup and discard any remainder.
Transfer the beer reduction to a blender. Add the soymilk or almond milk with the remaining ingredients (except for the optional horseradish). Do not add the coconut oil or acid to the blender. Process the contents until smooth, stopping as necessary to dislodge any dry powder from the sides of the blender with a flexible spatula.
Now add the coconut oil (but not the acid) to the blender and pulse the mixture once or twice only to disperse the oil but not completely blend. This is important. After pulsing, pour the mixture into the saucepan.
Cook the cheese according to the Preparation and Cooking Technique instructions in the Block Cheese section of The Non-Dairy Evolution Cookbook. Be sure to incorporate the acid mixture into the cooked cheese before pouring into a minimum 2-cup container to set.
Cover with plastic wrap and chill for a minimum of 6 hours. After chilling, transfer the set cheese to a mixing bowl and mash and stir thoroughly with a fork until smooth. Stir in the optional prepared horseradish. Transfer to a crock or other suitable container and chill until ready to serve.
Print Recipe
Crock Beer Cheese (Non-dairy, of course)
Votes: 10
Rating: 4.8
You:
Rate this recipe!
|
|
Votes: 10
Rating: 4.8
You:
Rate this recipe!
|
 This is my own breading blend for creating an extra-crispy seasoned coating when frying plant-based chikun or pressed tofu “tenders”.
Ingredients for the dry mixture
• 1 and ½ cup all-purpose flour or rice flour
• 2 tsp onion powder
• 2 tsp garlic powder
• 2 tsp fine sea salt or kosher salt
• 2 tsp sweet paprika (or smoked paprika for a smoky flavor)
• 1 tsp coarse ground black pepper
Ingredients for the batter
• 1 cup all-purpose flour or rice flour
• 2 tsp baking powder (preferably aluminum-free)
• 1 tsp fine sea salt or kosher salt
• 1 and ½ cup organic plain unsweetened soymilk or non-dairy buttermilk
(buttermilk recipes can be found in the Non-Dairy Evolution Cookbook)
Other ingredients
• high-temp cooking oil for frying
Preparation
Sift or whisk the dry ingredients together in a large bowl.
In a separate large bowl, whisk together the batter ingredients until smooth (small lumps are okay). The batter will thicken upon standing. A thick batter is ideal for this technique so do not dilute with additional milk.
Dip the plant protein of your choice into the dry mixture. Dip into the batter until coated evenly; shake off any excess. Dip again into the dry mixture until coated evenly and set aside on a plate.
In a deep fryer, or deep skillet or wok, heat a sufficient amount of cooking oil to 350°F (test with an instant-read thermometer). Fry in the hot oil until golden brown, turning occasionally. Place on a plate lined with several layers of paper towels to drain. Serve hot or cold.
Print Recipe
Triple Dip Seasoned Breading for Frying
Votes: 14
Rating: 4.21
You:
Rate this recipe!
|
|
Votes: 14
Rating: 4.21
You:
Rate this recipe!
|
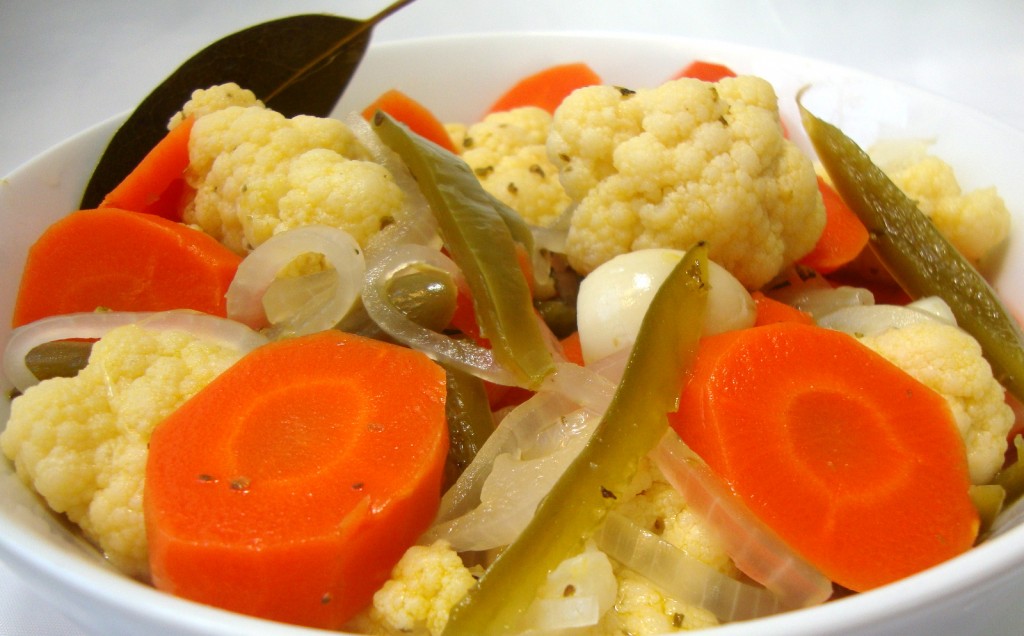 “Escabeche” is the Spanish word for “pickle”. This simple but zesty combination of crunchy pickled vegetables is a favorite for serving with Mexican cuisine.
Ingredients
• 2 T olive oil
• 1 large yellow or white onion, peeled and thinly sliced
• 3 large carrots, peeled and sliced
• florets from 1 small cauliflower
• 12 whole cloves garlic
• 3 large jalapeno or serrano chilies, seeded, membrane removed and sliced lengthwise into slivers
• 3 T coarse sea salt or kosher salt
• 2 and ½ cups water
• 1 cup champagne vinegar, white wine vinegar or distilled white vinegar
• 1 T organic sugar
• 2 bay leaves
• ½ tsp dried oregano
• ½ tsp dried marjoram
• ½ tsp dried thyme
Technique
Add the olive oil to a large cooking pot and place over medium-low heat. Add the vegetables and salt and sweat the mixture for about 10 minutes until softened. Keep the heat on the low side to avoid browning the vegetables.
Add the water, vinegar, sugar and herbs and bring to a rapid boil. Cover the pot and remove from the heat to cool. When cooled, divide the mixture between 2 one-quart jars (be sure to include a bay leaf into each jar), seal and refrigerate for a minimum of 3 days before serving (the longer the better). The refrigerated escabeche will last for a few months stored in this manner.
To seal the jars and preserve the escabeche for pantry storage, removing the pot from the heat. Carefully divide the hot mixture between 2 one-quart mason jars (be sure to include a bay leaf in each jar). Put the lids in place and tighten the lid rings. Invert the jars for 10 minutes. After 10 minutes, upright the jars and slightly loosen the lid rings. Let the jars rest and cool until the lids “pop” and seal shut. Retighten the lid rings and store the jars in your pantry until ready to use.
Print Recipe
Escabeche (Mexican Spicy Pickled Vegetables)
Votes: 236
Rating: 3.91
You:
Rate this recipe!
|
|
Votes: 236
Rating: 3.91
You:
Rate this recipe!
|
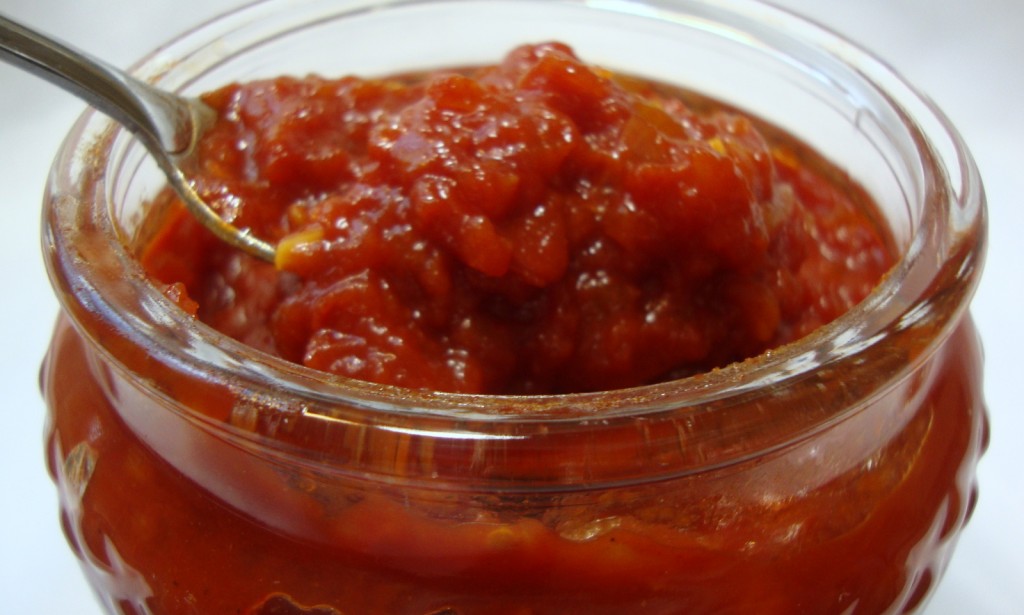 Although many people consider tomatoes to be a vegetable, they’re actually a fruit; so why not make them into jam? Actually, tomato jam is more like a relish than a true jam. My partner Chef Mike and I created this blend one Sunday afternoon and we were thrilled with the lovely balance of sweet, tangy and smoky flavors. This jam is wonderful when used as an alternative to ketchup on veggie burgers and hot dogs. It’s also excellent when served with cheese, such as non-dairy chèvre, on crostini or crusty bread. This recipe yields about 2 cups.
Ingredients
• 1 can (28 oz) whole peeled plum tomatoes or 1 and ½ lb fresh plum tomatoes
• 1 T olive oil
• ½ cup diced sweet yellow onion
• 3 cloves garlic, minced
• ½ cup organic sugar
• ¼ cup sherry vinegar
• 2 T tomato paste
• 2 tsp smoked paprika
• 1 tsp fine sea salt or kosher salt
• ½ tsp ground white pepper
Technique
Drain the excess liquid from the can of tomatoes and place the tomatoes into a food processor; do not process yet. If using fresh tomatoes, bring a large volume of water to a boil. Core the tomatoes and place them into the boiling water for 1 minute. Immediately plunge them into an ice water bath. Once cooled, the skins should slip off easily. Place the tomatoes into the food processor; do not process yet.
In a medium saucepan, sweat the onion and garlic in the olive oil over medium-low heat, stirring occasionally. The goal is to soften and draw out the flavor of the onion and garlic without browning. When the onion becomes translucent, transfer the mixture to the food processor with the tomatoes and pulse a few times into a “salsa-like” consistency.
Transfer the tomato mixture back to the saucepan and stir in the remaining ingredients. Bring the mixture to a boil, reduce the heat to a gentle simmer and cook uncovered for 1 hour and 15 minutes, stirring occasionally. Let the jam cool and transfer to a sealable container. Refrigerate until well-chilled before serving. Keep in mind that this is a fresh jam, not a preserved jam, but the acidity and sugar will keep it fresh in the refrigerator for a few weeks.
Print Recipe
Sweet and Smoky Tomato Jam
Votes: 7
Rating: 4.43
You:
Rate this recipe!
|
|
Votes: 7
Rating: 4.43
You:
Rate this recipe!
|
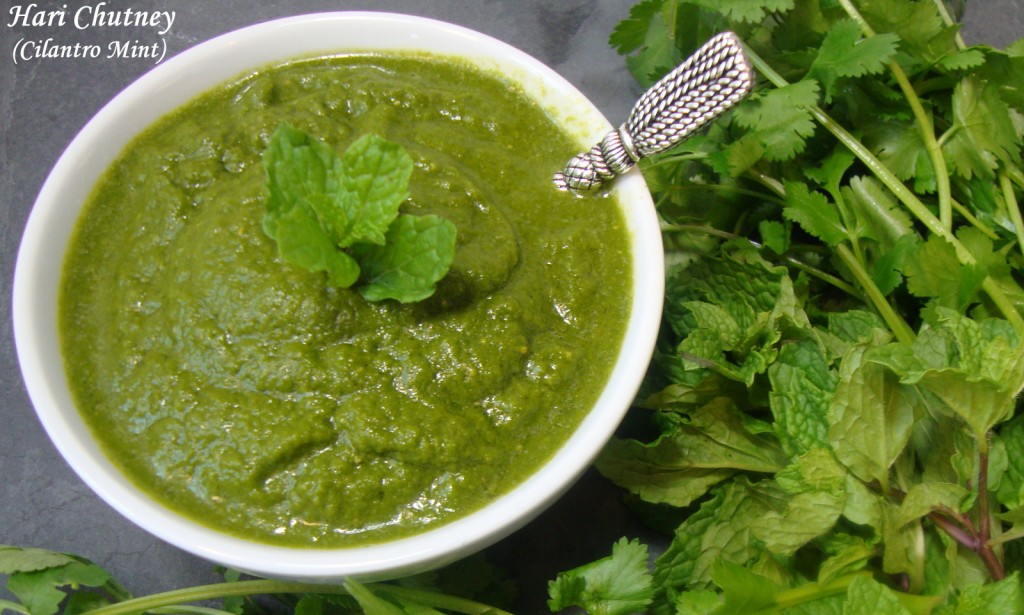 This bright green, tangy and refreshing Indian chutney is my absolute favorite condiment. Enjoy it with all Indian cuisine and as a spread or dip for samosa (deep-fried or baked pastry with savory filling), pakoras (Indian vegetable fritters) naan, papadum, roti and any and all other flatbreads and crackers. If you have a timid palate, start with ½ of the green chile and increase according to taste. Try mixing the chutney with plain non-dairy yogurt for a uniquely different salad dressing. It also adds wonderful flavor to non-dairy Crème Fraîche, sour cream and even eggless mayonnaise. The chutney will last about 1 week stored in the refrigerator; simply freeze any unused portion (try freezing in silicone molds or ice cube trays for easy use). This recipe yields about 1 and ¾ cup.
Ingredients
• 2 large bunches of cilantro (excess stems at bottom removed)
• 1 large handful of mint leaves (stems removed)
• 1 medium yellow onion, peeled and chopped
• 1 small green chile, seeded and chopped (or a large chile if you can take the heat)
• 1 clove garlic, peeled
• 2 T fresh lemon juice
• 1 tsp cumin seeds
• ¾ tsp sea salt or kosher salt, or more to taste
Technique
Process all ingredients in a blender until smooth. Season with additional salt to taste as desired. Store in an airtight container in the refrigerator.
Print Recipe
Hari Chutney (Cilantro Mint)
Votes: 0
Rating: 0
You:
Rate this recipe!
|
|
Votes: 0
Rating: 0
You:
Rate this recipe!
|